Source
Do you want to streamline Facebook page engagement? Looking for an easier way to stay on top of comments and conversations?
In this article, you’ll learn how to moderate conversations happening on your Facebook business page’s posts, ads, and video using native tools from Meta.

You can disable posts by other people on your page, which prevents customers or potential clients from creating posts. Or you can opt to review the posts that other users create before they go live. In addition, you can opt out of allowing photo and video posts.
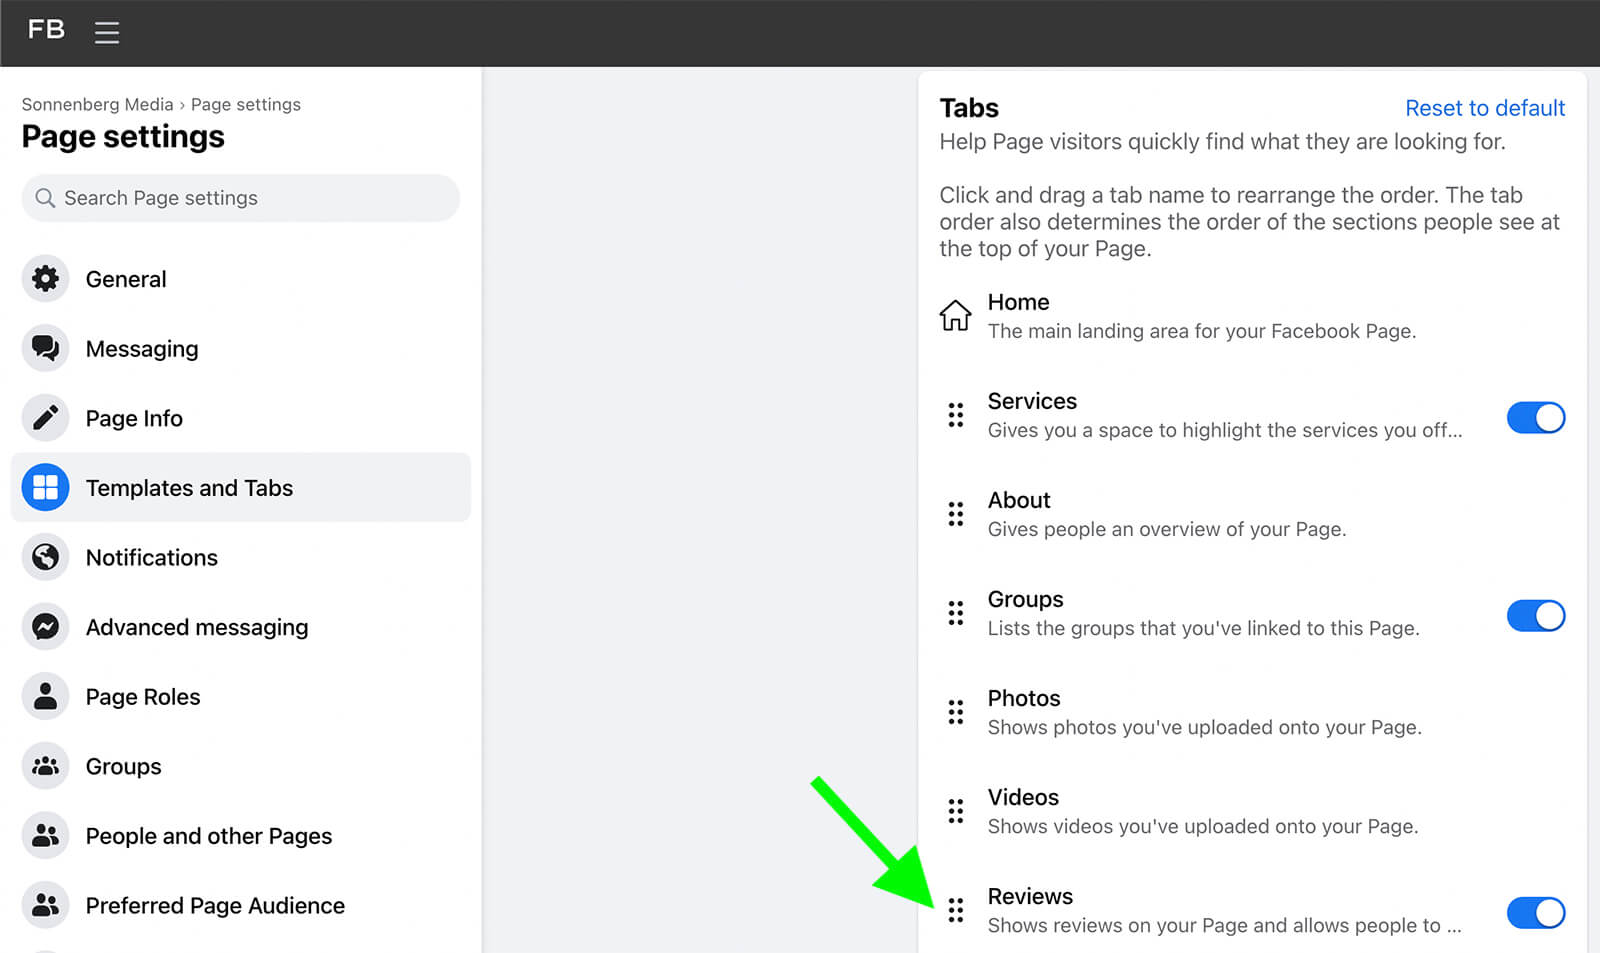
To switch off reviews, open the Templates and Tabs menu in your page settings. Look for the Reviews tab and switch it off. Reviews will no longer appear on your page and visitors won’t be able to leave new ones.
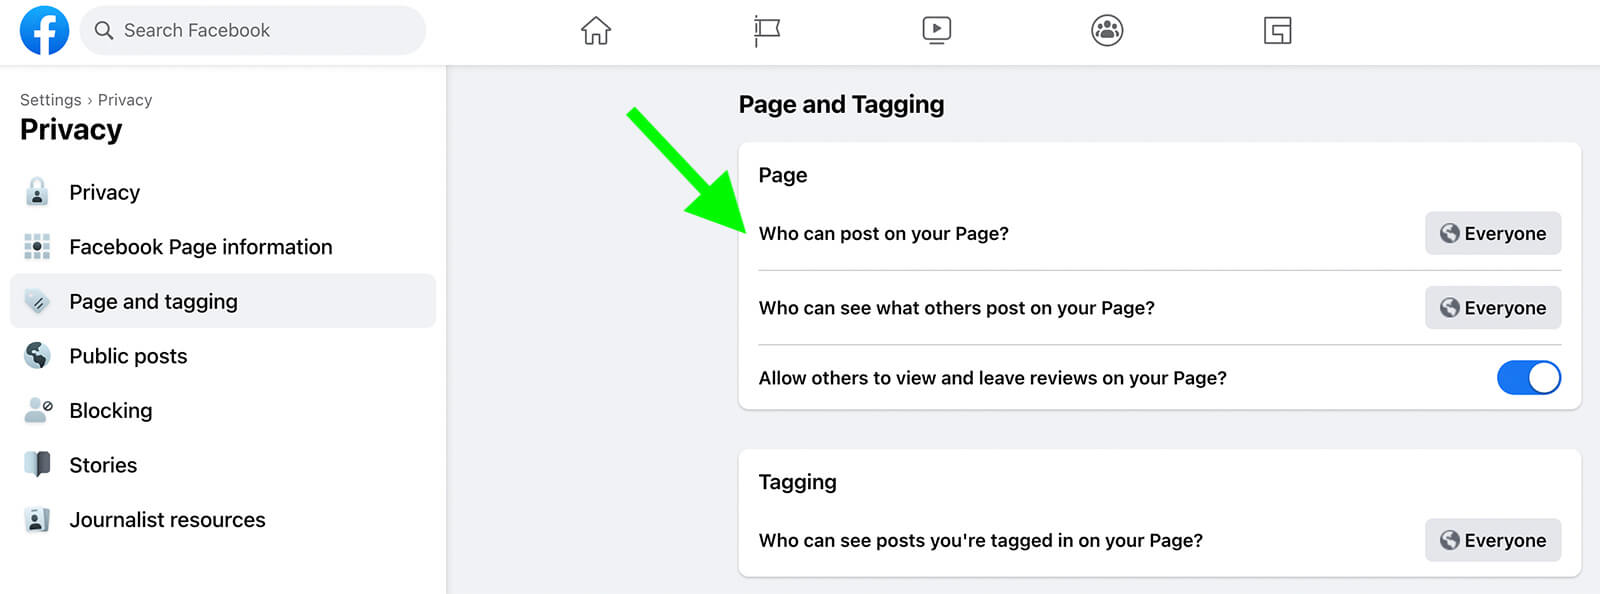
From your page settings, click the Privacy tab and select Page and Tagging. If you want to prevent visitors from creating posts on your page, go to Who Can Post on Your Page? and click the Everyone button.
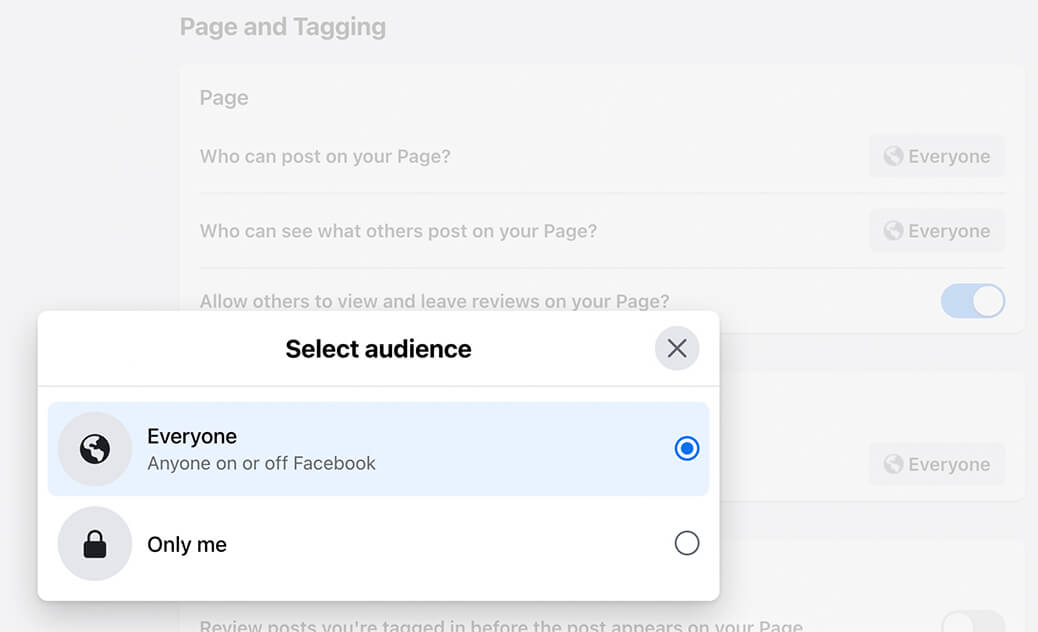
You’ll see an option to select Only Me instead. If you select this setting, no one aside from your page will be able to write posts, share links, or publish photos and videos on your page.
You also have the option to turn reviews on or off from this tab. To switch the settings, click the toggle next to the Allow Others to View and Leave Reviews on Your Page? option.
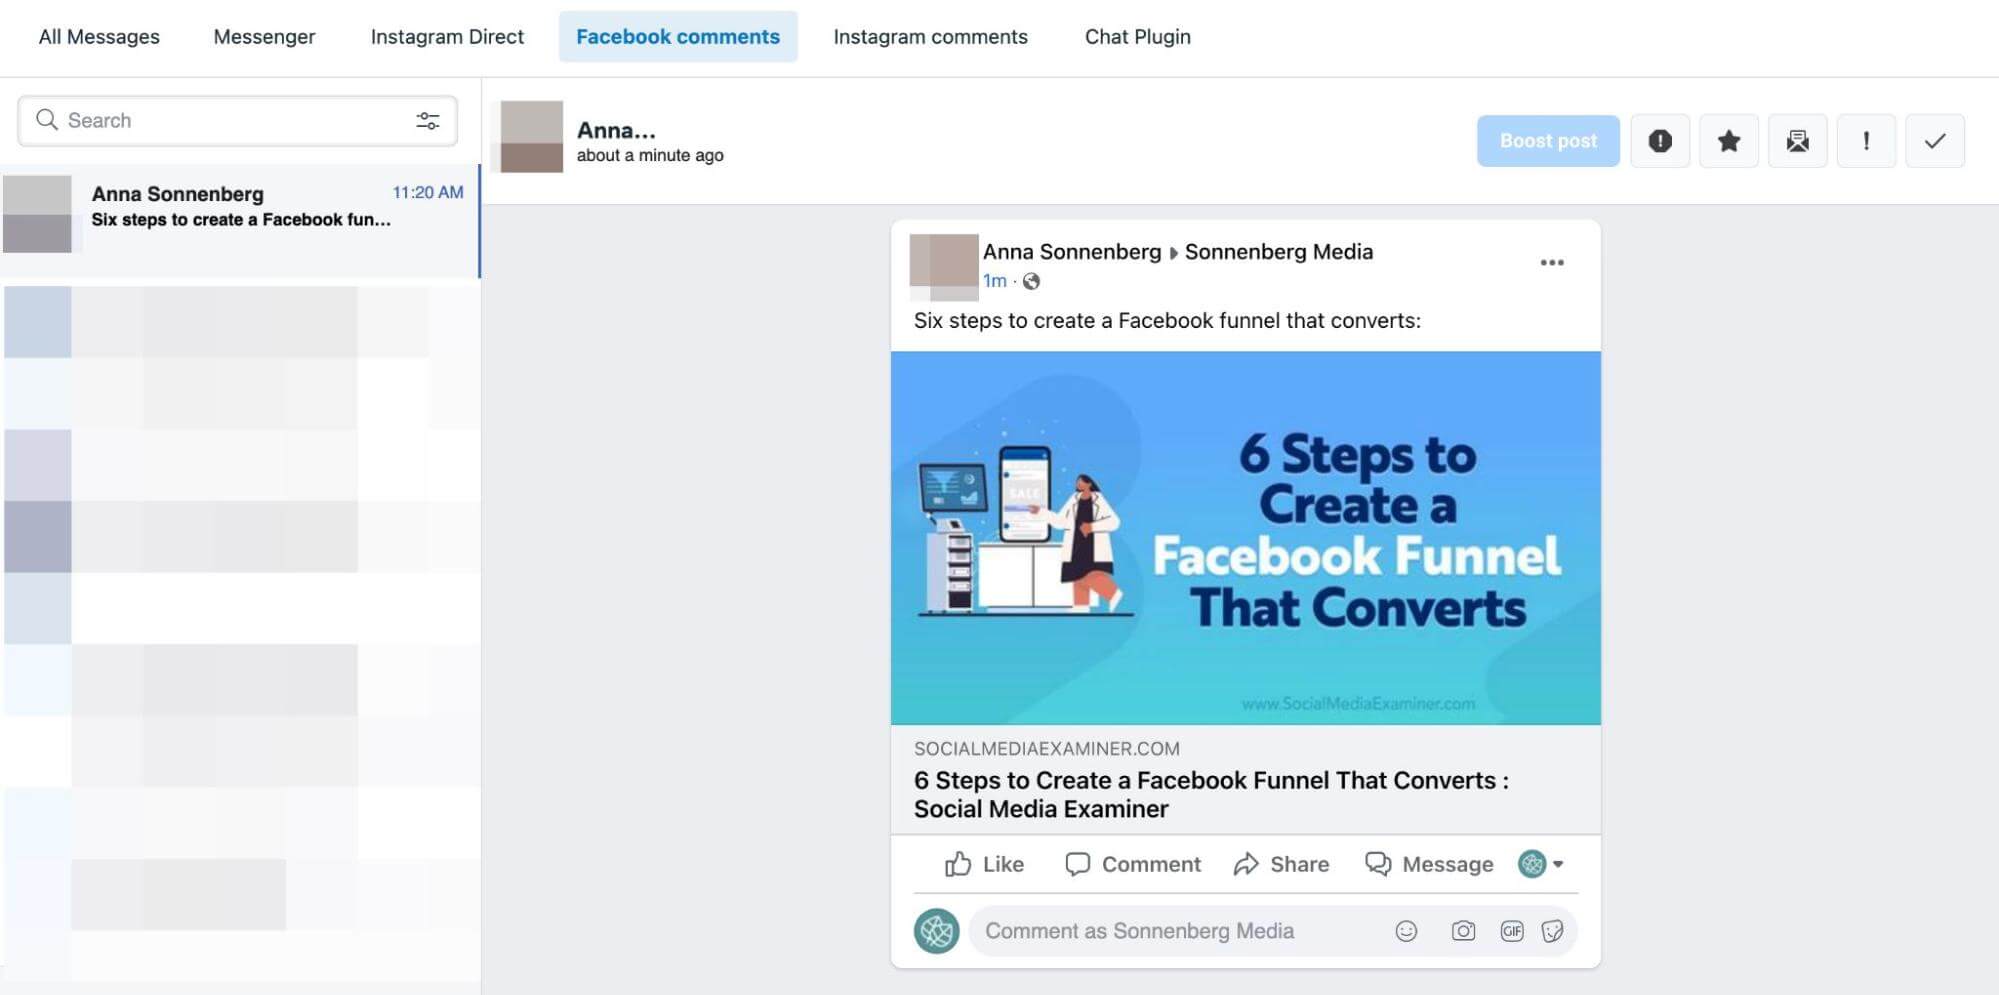
When you click on a visitor post or customer review, you have the option to react, comment, or share. If the post features sensitive content, you might also consider responding privately. Click the Message button to send a direct message instead.
Note that Facebook only allows pages to respond with a DM for up to 7 days after the original post. If you missed the 7-day window, you can always comment and encourage the original poster to message your page. But it’s a better idea to monitor page posts and reviews regularly so you don’t miss something important.
But if your content receives a lot of spammy or irrelevant, unwanted comments, you have a lot of helpful options to moderate comments efficiently. Let’s look at switching off comments on certain posts, automatically moderating engagement, and other native Meta tools.
If you’re using the classic pages experience, go to your page and find the post you want to moderate. Click the three dots in the upper-right corner of the post and select the Who Can Comment on Your Post? option.
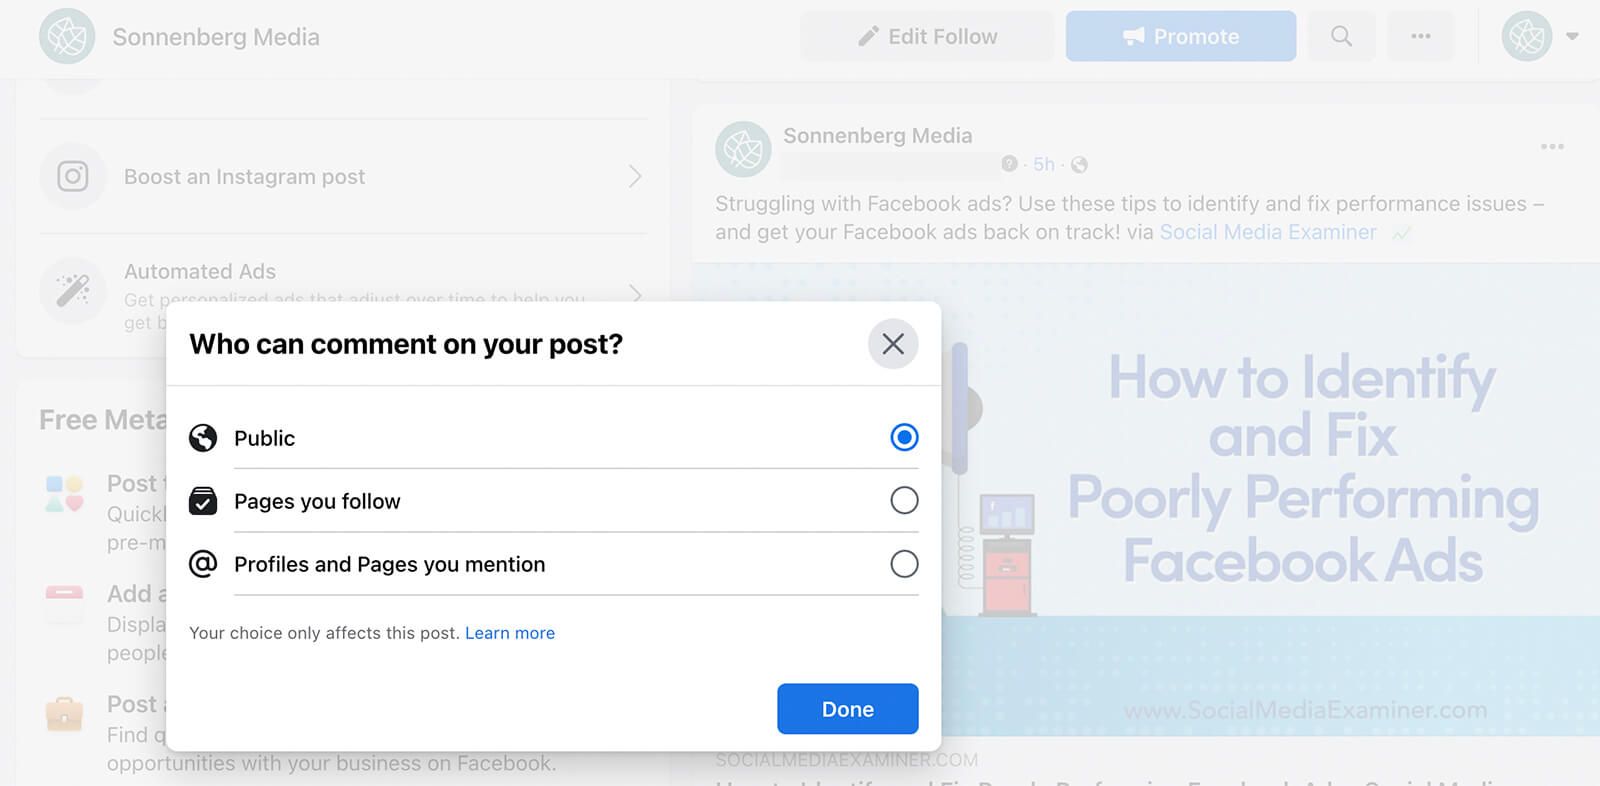
Then consider the options. By default, commenting is public but you can change it to Pages You Follow if you want to limit commenting to a smaller group. If you only want a select few people to be able to comment, choose Profiles and Pages You Mention instead. Then make sure you’ve tagged relevant profiles or pages in the post.
If your page has switched to the new pages experience, you can access moderation tools when you use Facebook as your page. Open Facebook, click your profile in the upper-right corner, and switch to your page.
Then navigate to your page, go to any post, and click the three dots in the upper-right corner. Select Who Can Comment on Your Post?, and then choose whether you want to keep commenting public or limit it to certain profiles and pages only.
When you find a comment you want to remove from the post, click Hide Comment. The commenter and their connections will continue to see the comment on the post. But for everyone else, the comment will be hidden. You can always return to the post and unhide the comment.
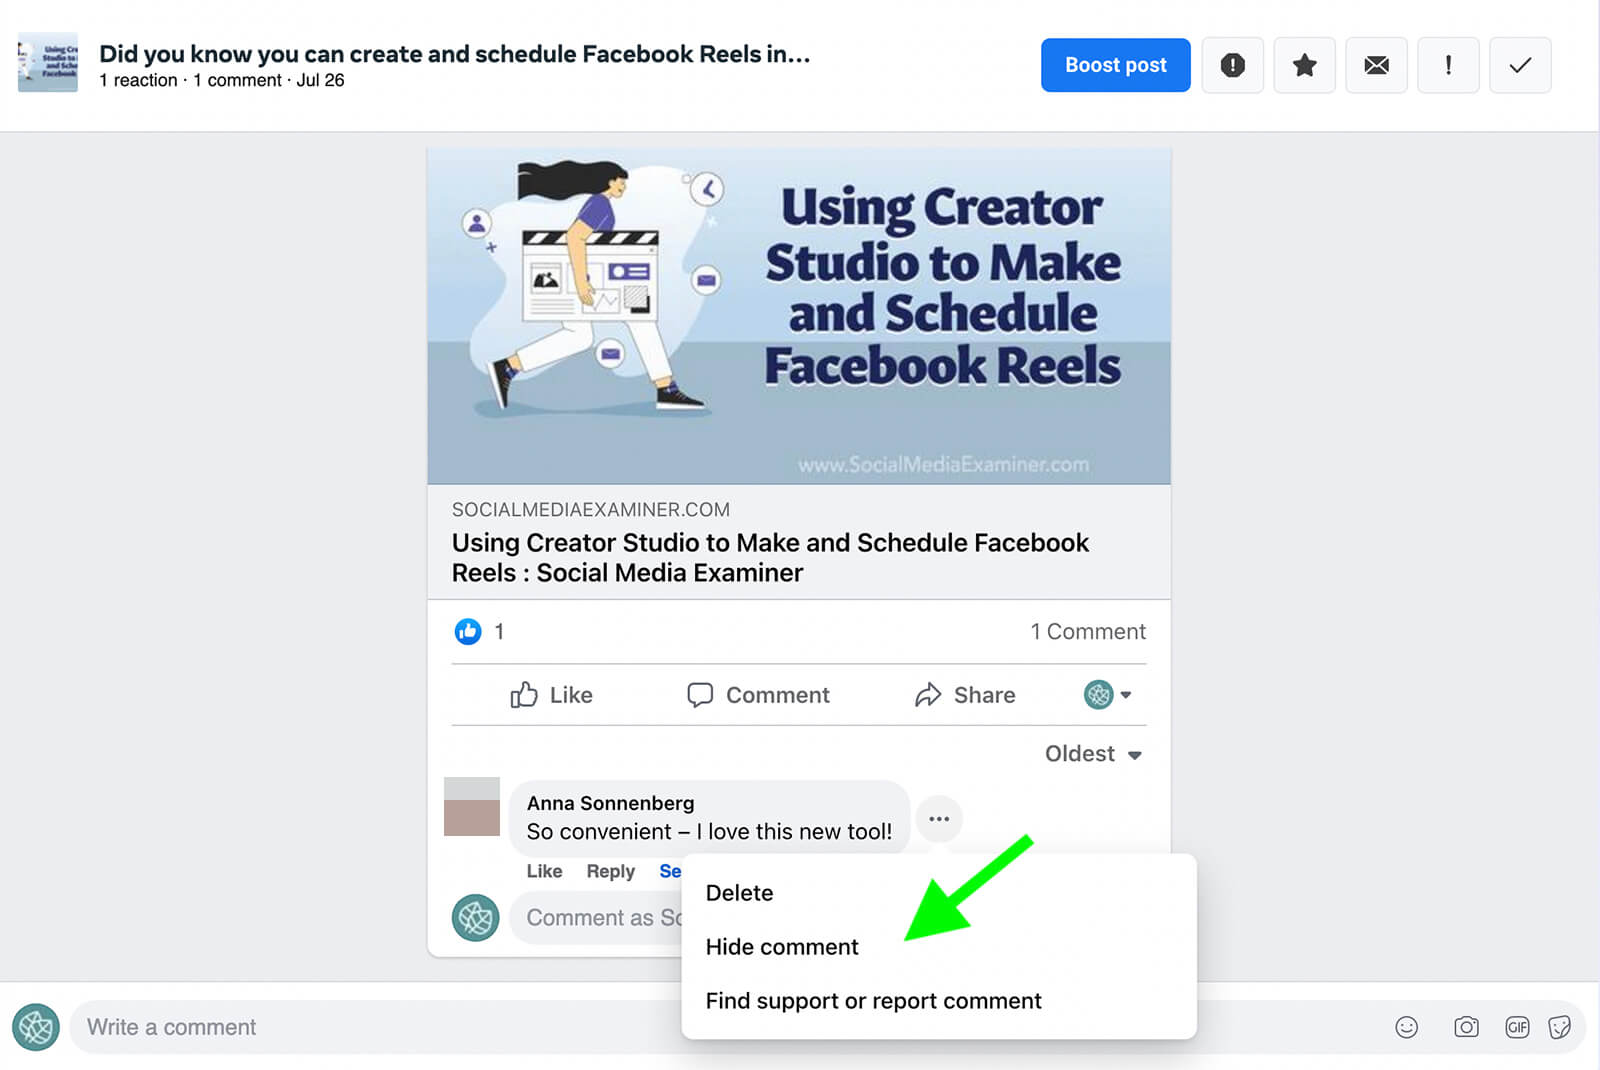
For a more permanent solution, you can use the same workflow to delete the comment completely. If the comment is harmful, violent, or otherwise offensive, you can also report the post to Meta.
In the classic Facebook pages experience, start by going to Page Settings and selecting the General tab. Look for Profanity filter and click the Edit button. To turn it on, check the box and click Save Changes. Meta will automatically hide posts and comments that use common profanity.
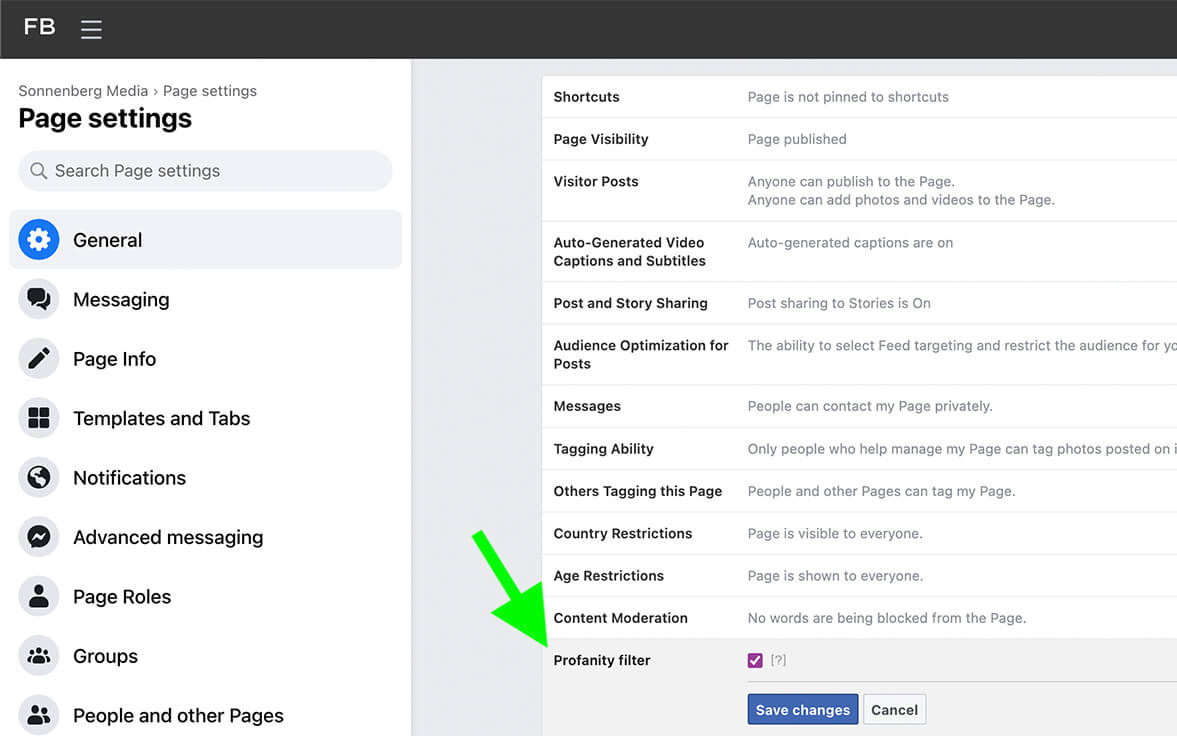
To block certain words from comments on your page, look for Content Moderation and click the Edit button. You can add up to 1,000 keywords or emojis that you want to hide automatically from your page. If you have a long list, upload it as a CSV file.

In the new Facebook pages experience, you can find comment moderation by going to Settings, clicking on Privacy, and then selecting Public Posts. Then scroll down to Content Moderation. If the Profanity filter option isn’t already on, click Edit to begin using it.
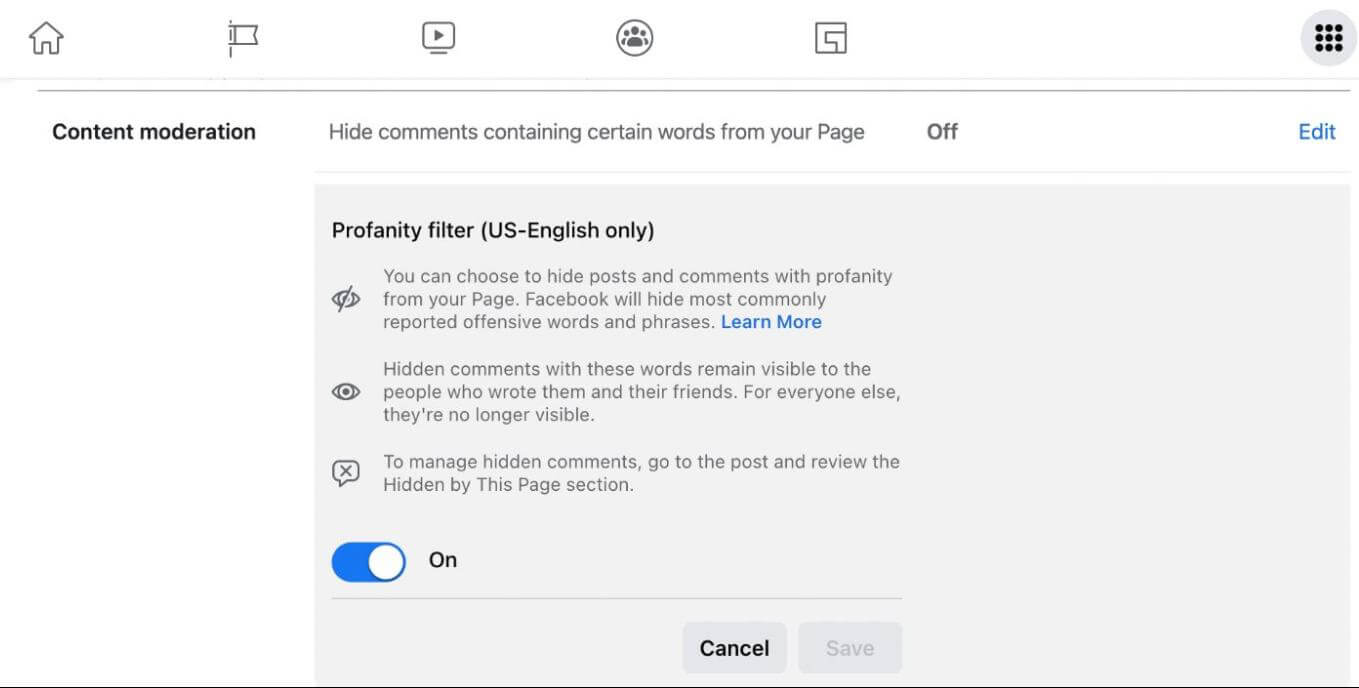
For more control over the terms you ban from your page, click the Edit link next to Hide Comments Containing Certain Words From Your Page. Then add all of the terms and emojis you want to hide.
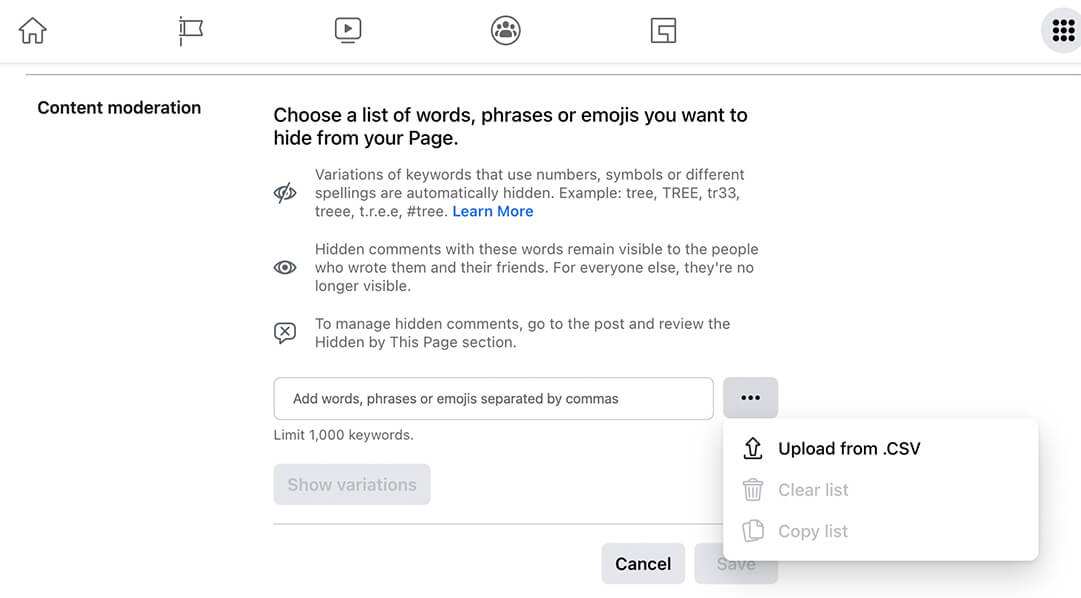
Keep in mind that Facebook automatically bans keyword variations so there’s no need to enter every possible spelling or usage. Click the Show Variations button to check similar terms and remove any that you don’t want to hide.
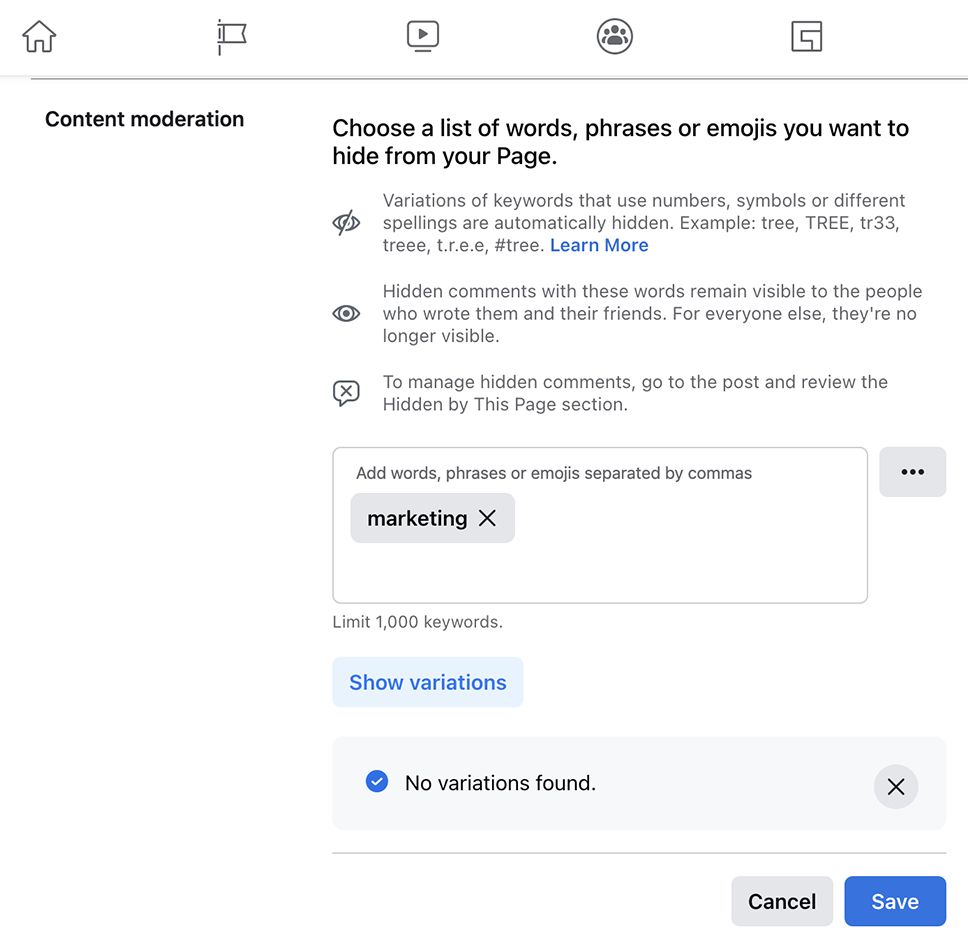
If your team has kept a running list of keywords to ban, you can click the three dots to upload a spreadsheet easily. You can also copy and paste a list from other programs or other pages you manage.
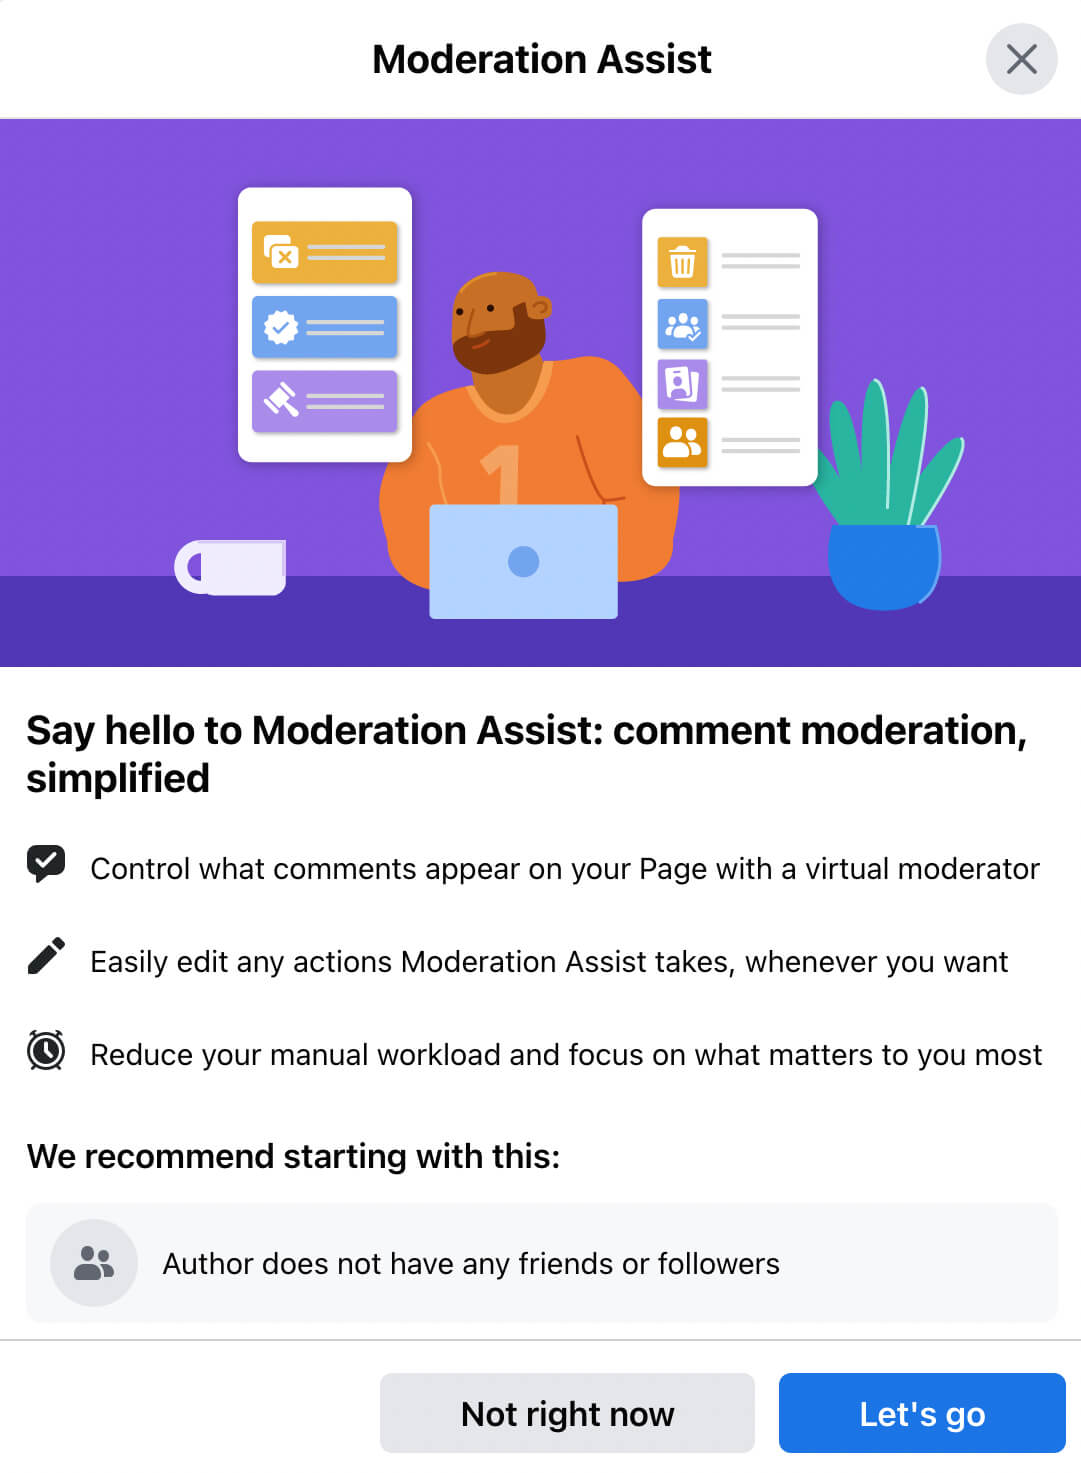
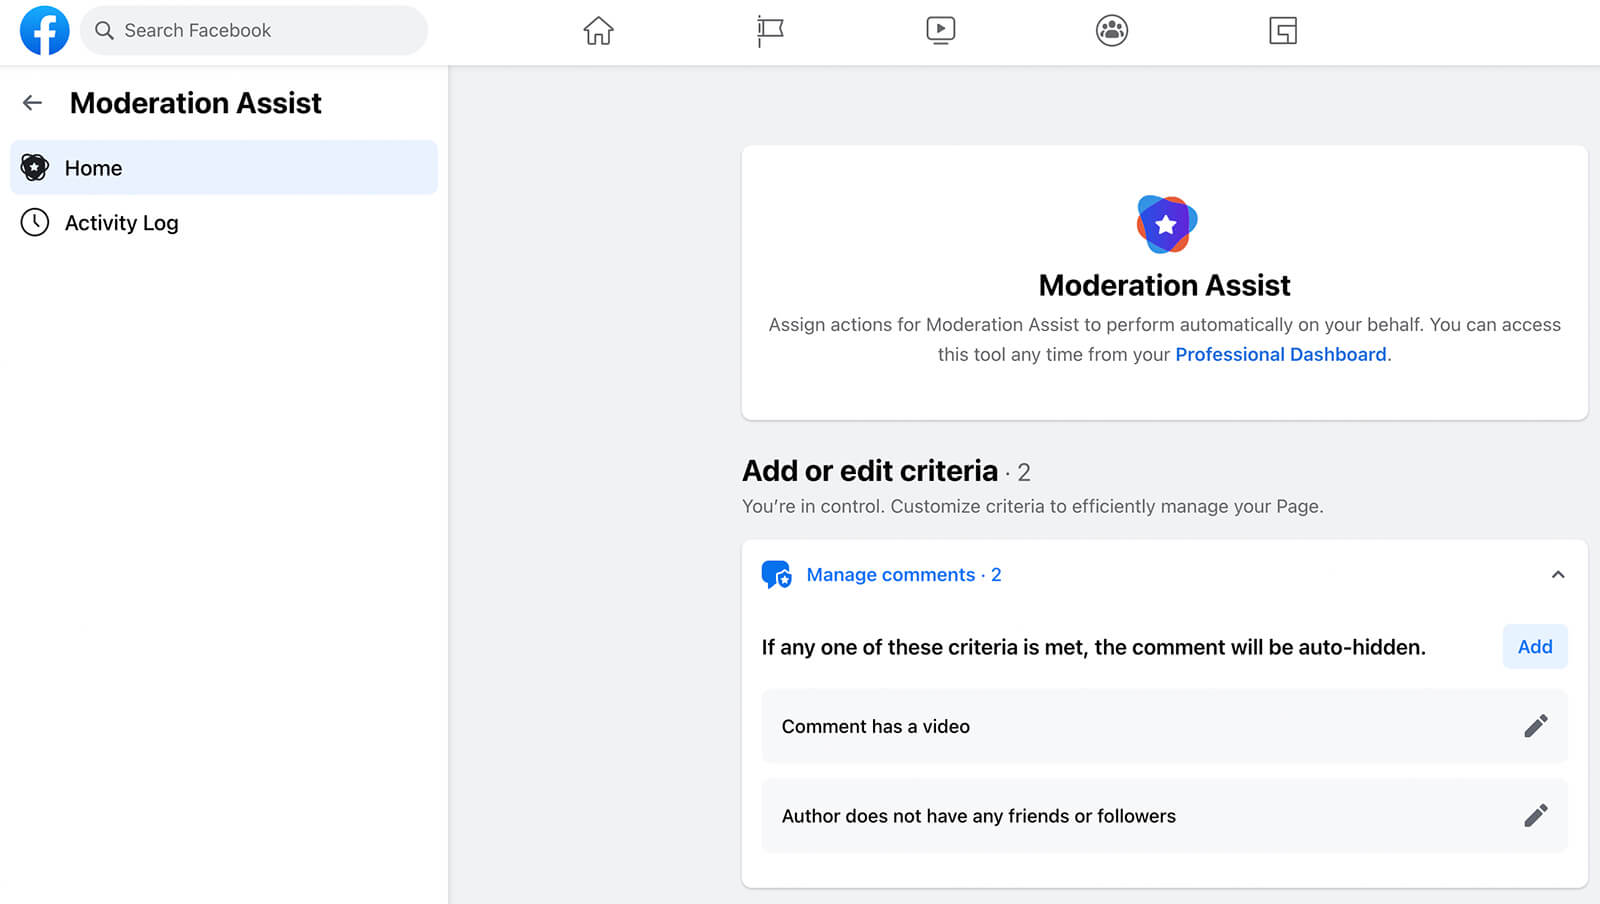
To access Moderation Assist from the new pages experience, switch to your page and open the professional dashboard. In the left-hand menu, select Moderation Assist and click the Let’s Go button to get started.
Facebook automatically recommends hiding comments from users with no connections. If your page has a lot of followers who are new to Facebook or who aren’t particularly active, you can click to remove this recommendation.
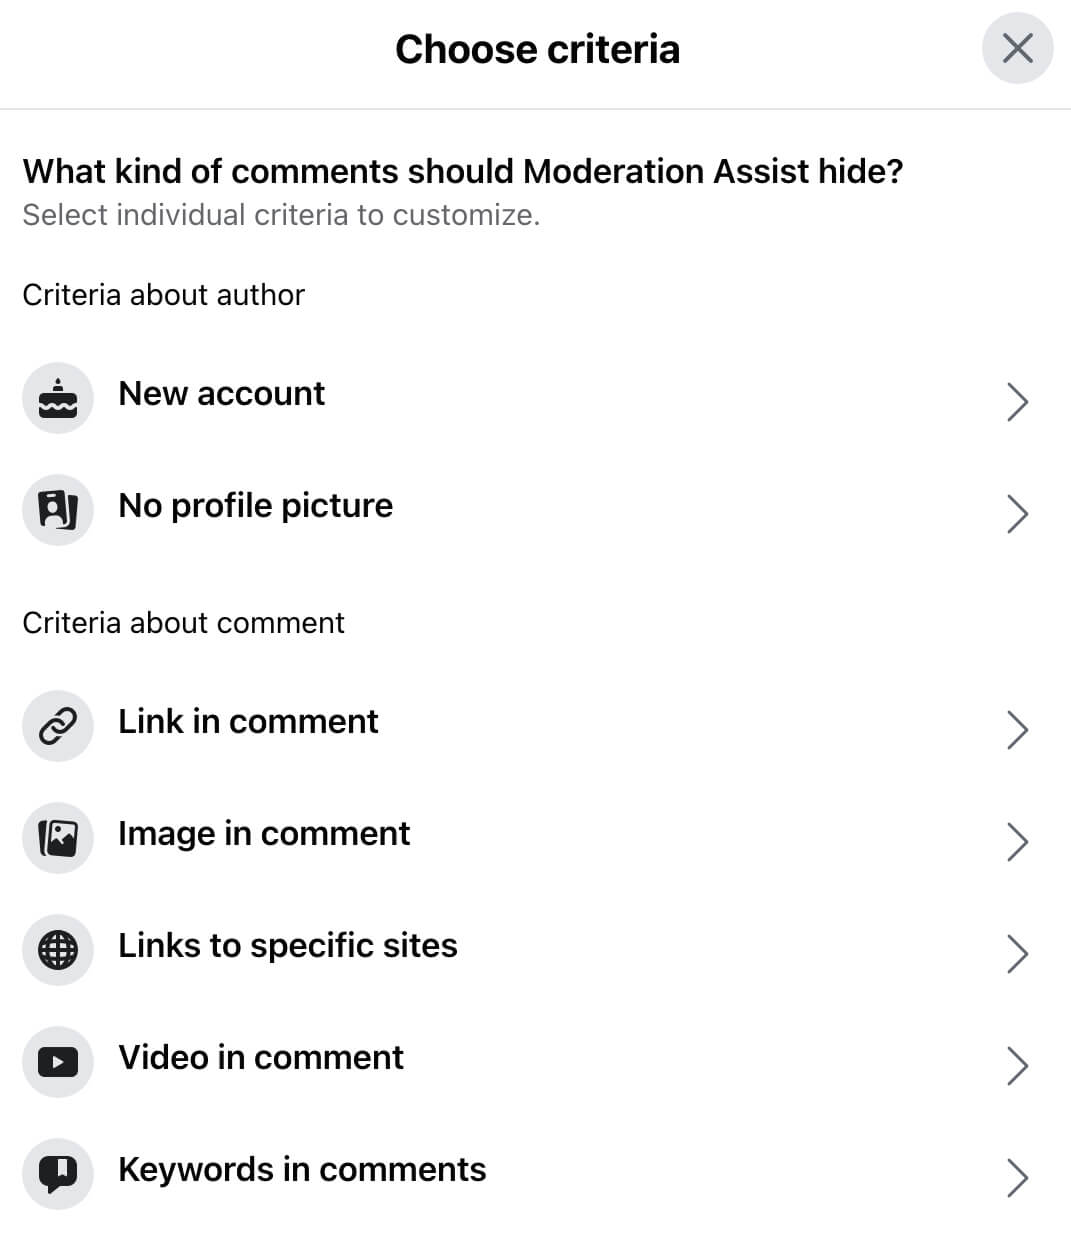
Otherwise, keep it and click the Add button to select more options. Here, you can choose from the full list of moderation options. For example, if you get a lot of spam comments from new users, you might want to hide comments from new accounts or those without a profile picture. To add one of these options, select it and click the Add button.
You can also ban content based on aspects of the comment. For example, you can automatically hide all comments with links or just links to certain sites. You can also hide comments that include media like images or videos. (Currently, there isn’t an option to ban GIFs only.)
Moderation Assist can also hide certain keywords automatically. Since this option does the same thing as the keyword moderation tool, it’s a good idea to choose one or the other. There’s no need to repeat blocked keywords on both lists. If you need to remove a banned keyword, using dual tools could complicate the process.
Once you set up the tool, you can track its activity and make changes at any time. Click the pencil icon to the right of any criterion to edit or remove it from the tool.
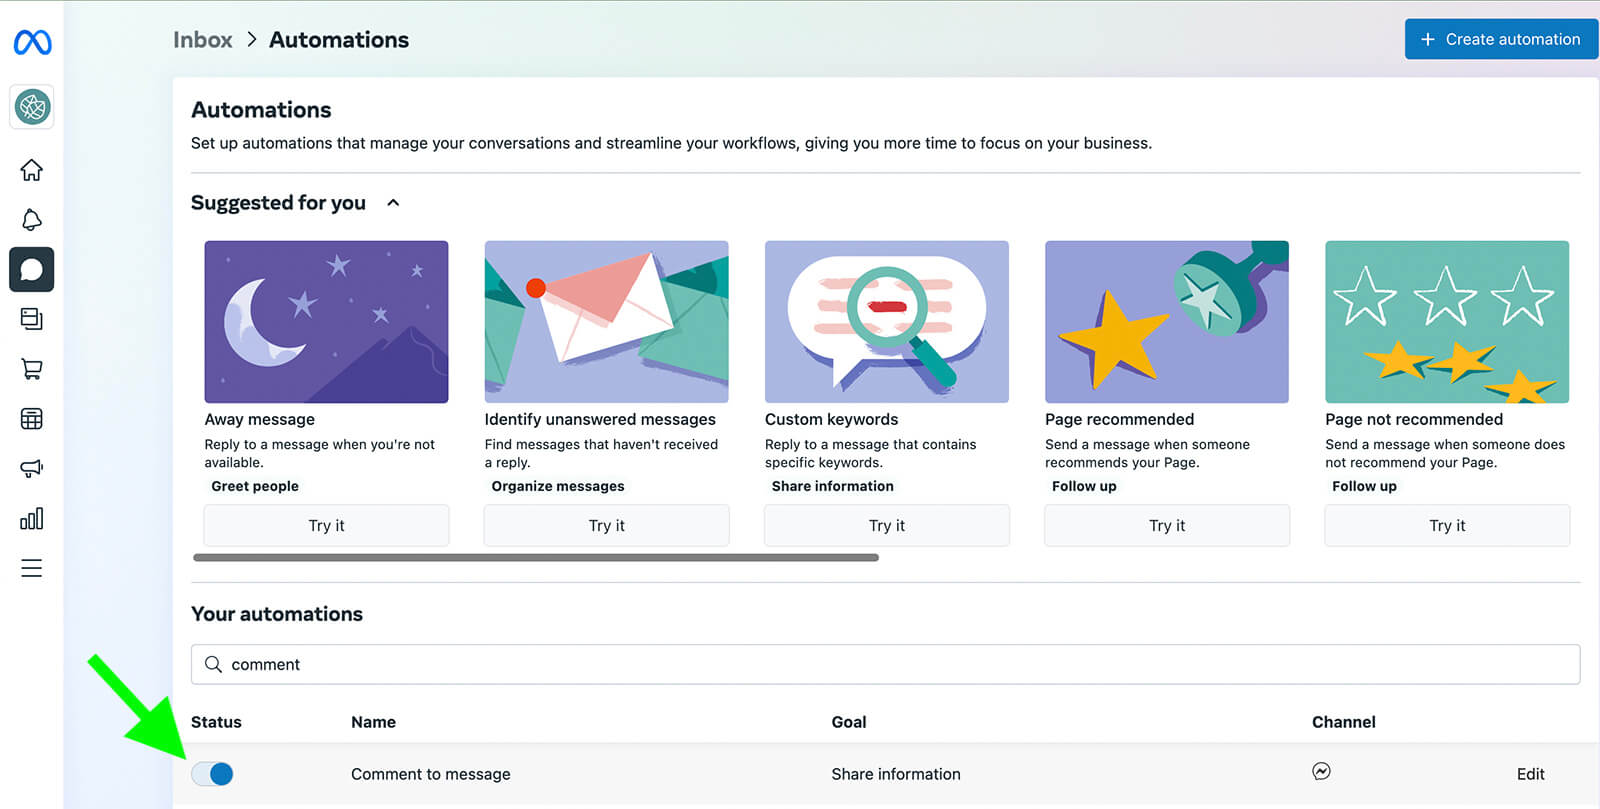
Open the inbox for your page and click Automations in the upper-right corner. Find Comment to Message in the list of automations and click Edit to adjust the settings. Note that you can’t automatically respond to comments publicly so responding with a message is your best option.
For example, say you receive a lot of questions about where to buy your products or how much they cost. You can set up a simple chatbot that sends relevant information in DMs and leverages Messenger marketing.
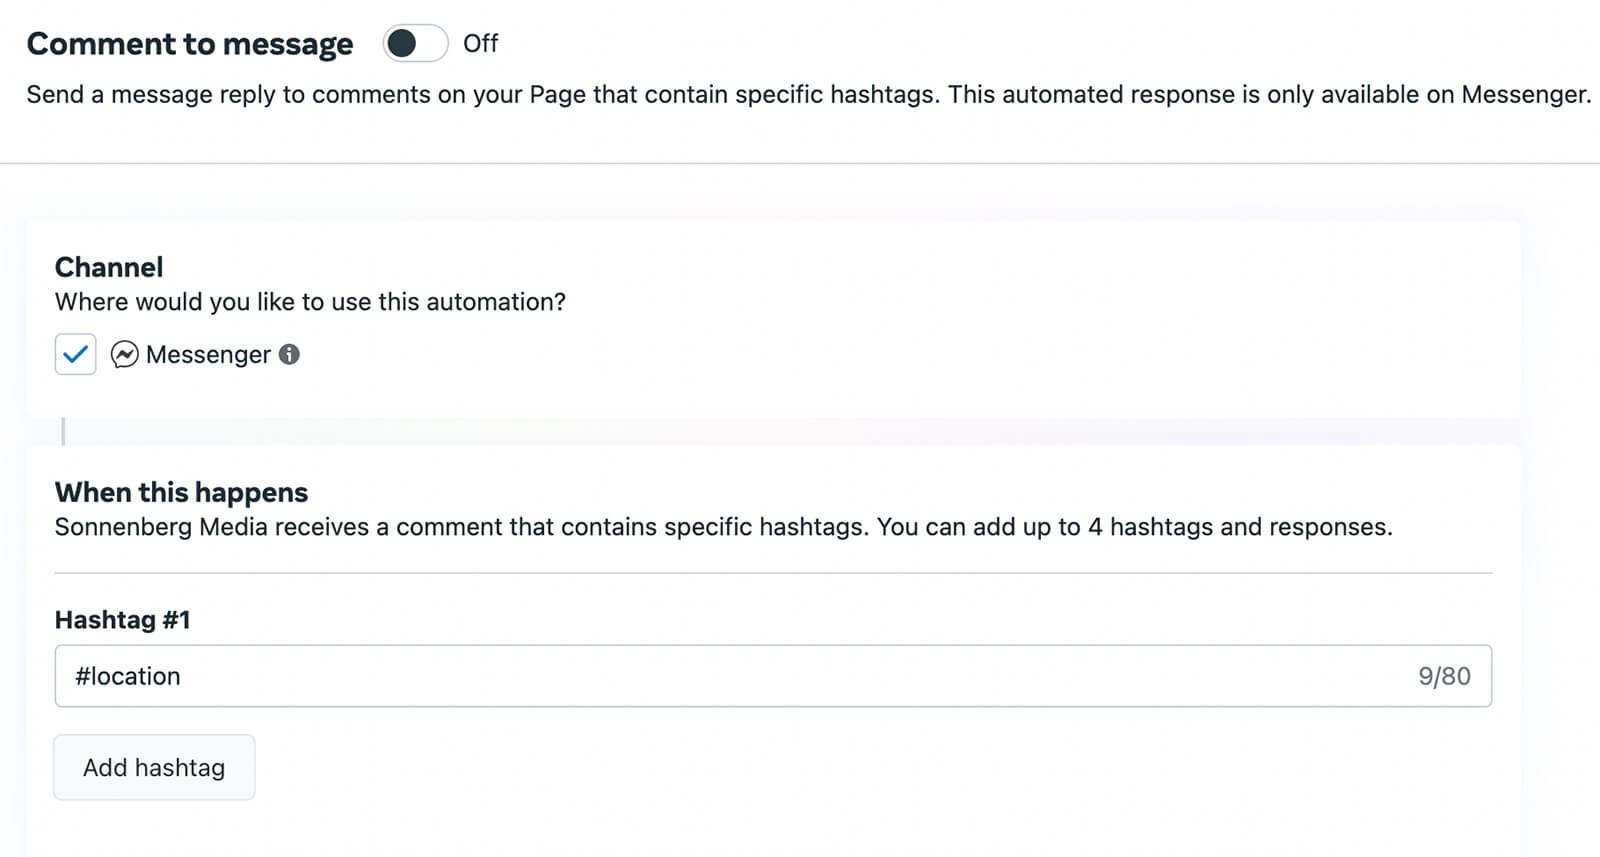
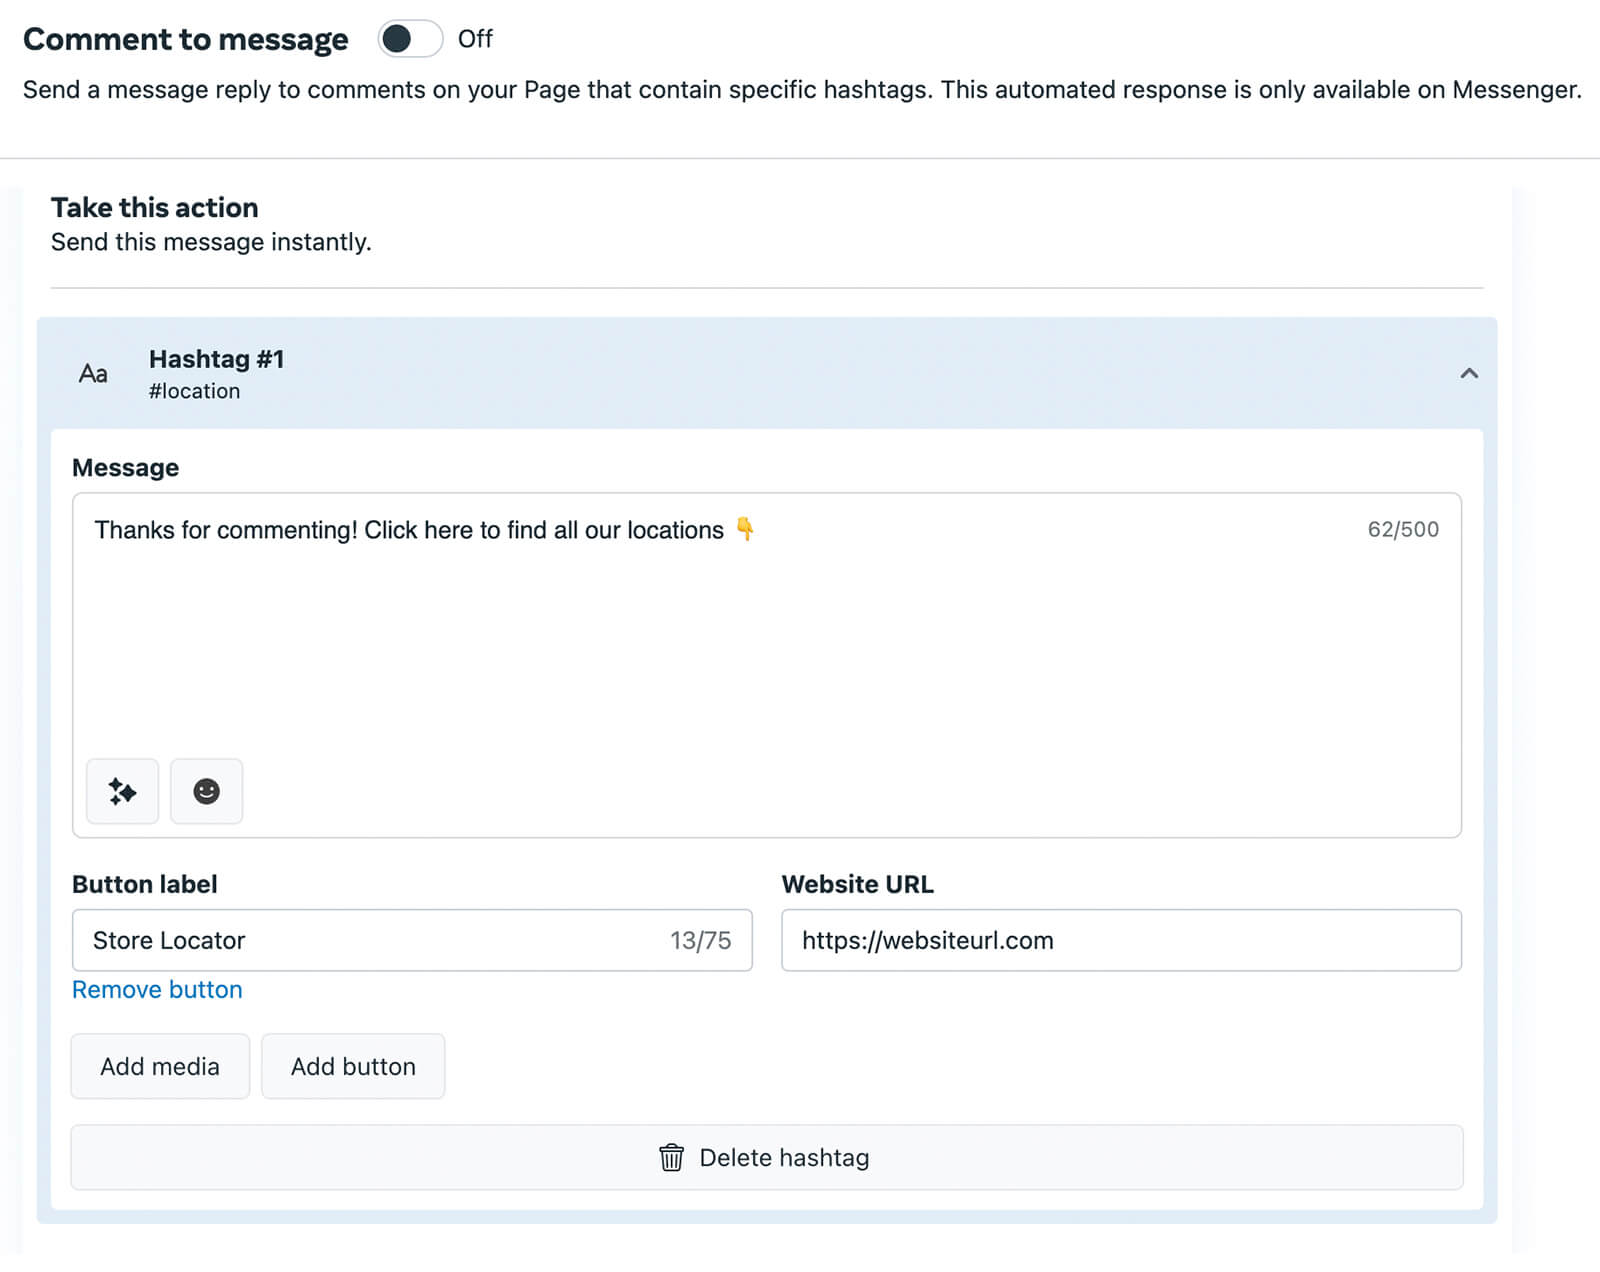
Start by adding a relevant hashtag. Then write a message with the information you want to share. You can add buttons, links, and emojis. You can also personalize the message to include commenters’ names. Save the automation and switch it on to begin using it to moderate comments.
Since Meta doesn’t allow advertisers to switch off ad comments altogether, it’s important to monitor ad engagement constantly. Fortunately, you can use a lot of the page moderation tools we covered above to manage comments on your ads.
For example, any keywords that your page automatically moderates will be hidden from comments on your ads as well. The same goes for your page’s profanity filter settings—they also apply to ad comments.
To review and respond to Facebook ad comments, use Business Suite. Just like organic post comments, ad comments give you the option to hide or delete as necessary.
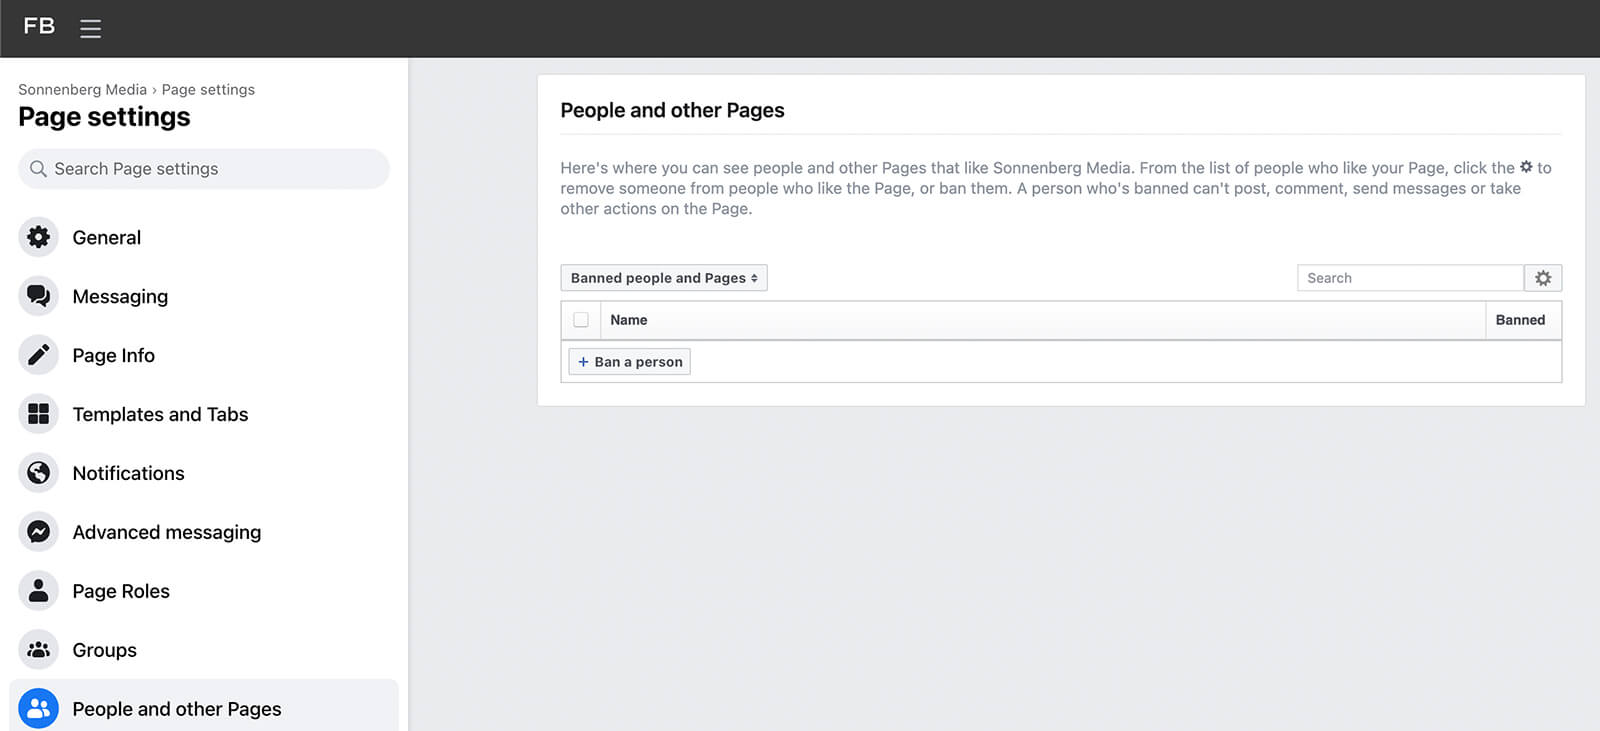
In extreme situations, you can also ban users from your page, which may become necessary if they repeatedly post negative or offensive comments on your ads. To block users from the classic pages experience, open Page Settings and select the People and Other Pages tab. Select Banned People and Pages from the drop-down menu and enter the person you want to block.
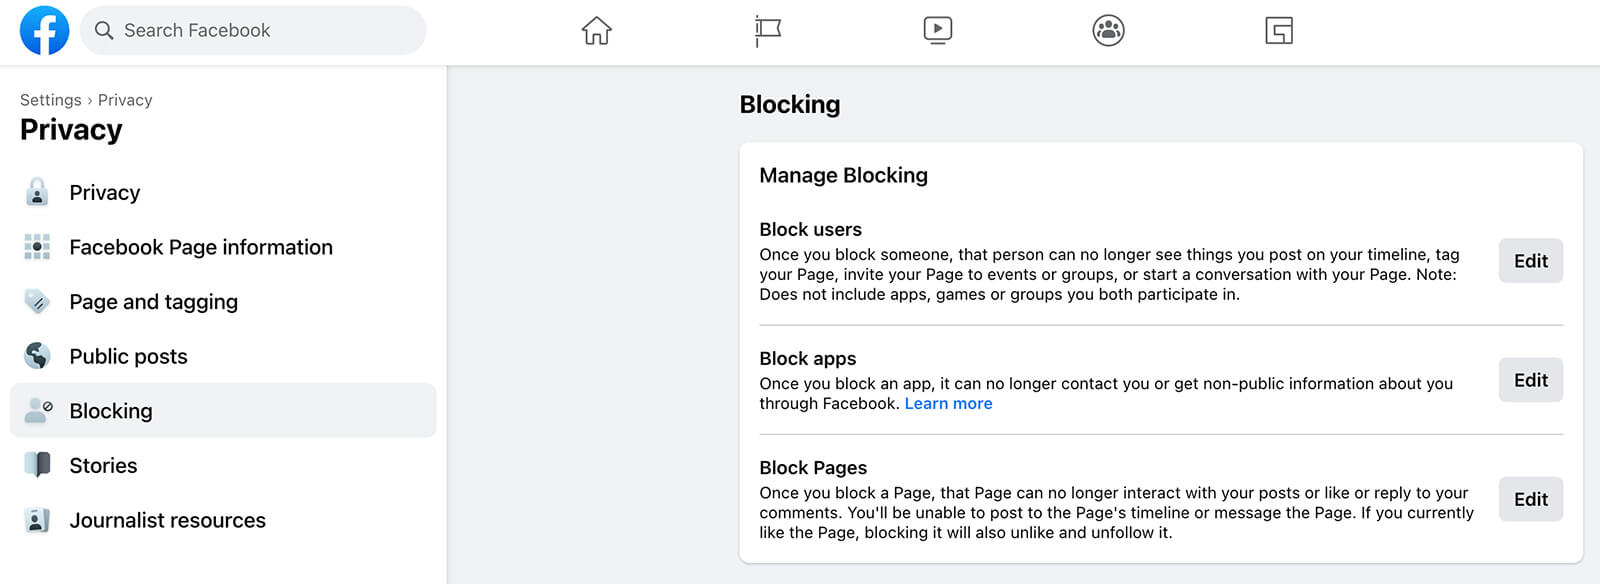
To block users from a page using the new pages experience, go to Settings, click Privacy, and then open the Blocking tab. Here, you can enter the users, pages, and apps you want to block from your page.
Then pick the setting that’s most likely to lead to a positive livestream. Use your past live experiences to guide your approach. For example, you can limit comments from new users or people who don’t follow your page. You can also prevent users from commenting more often than every 10 seconds.
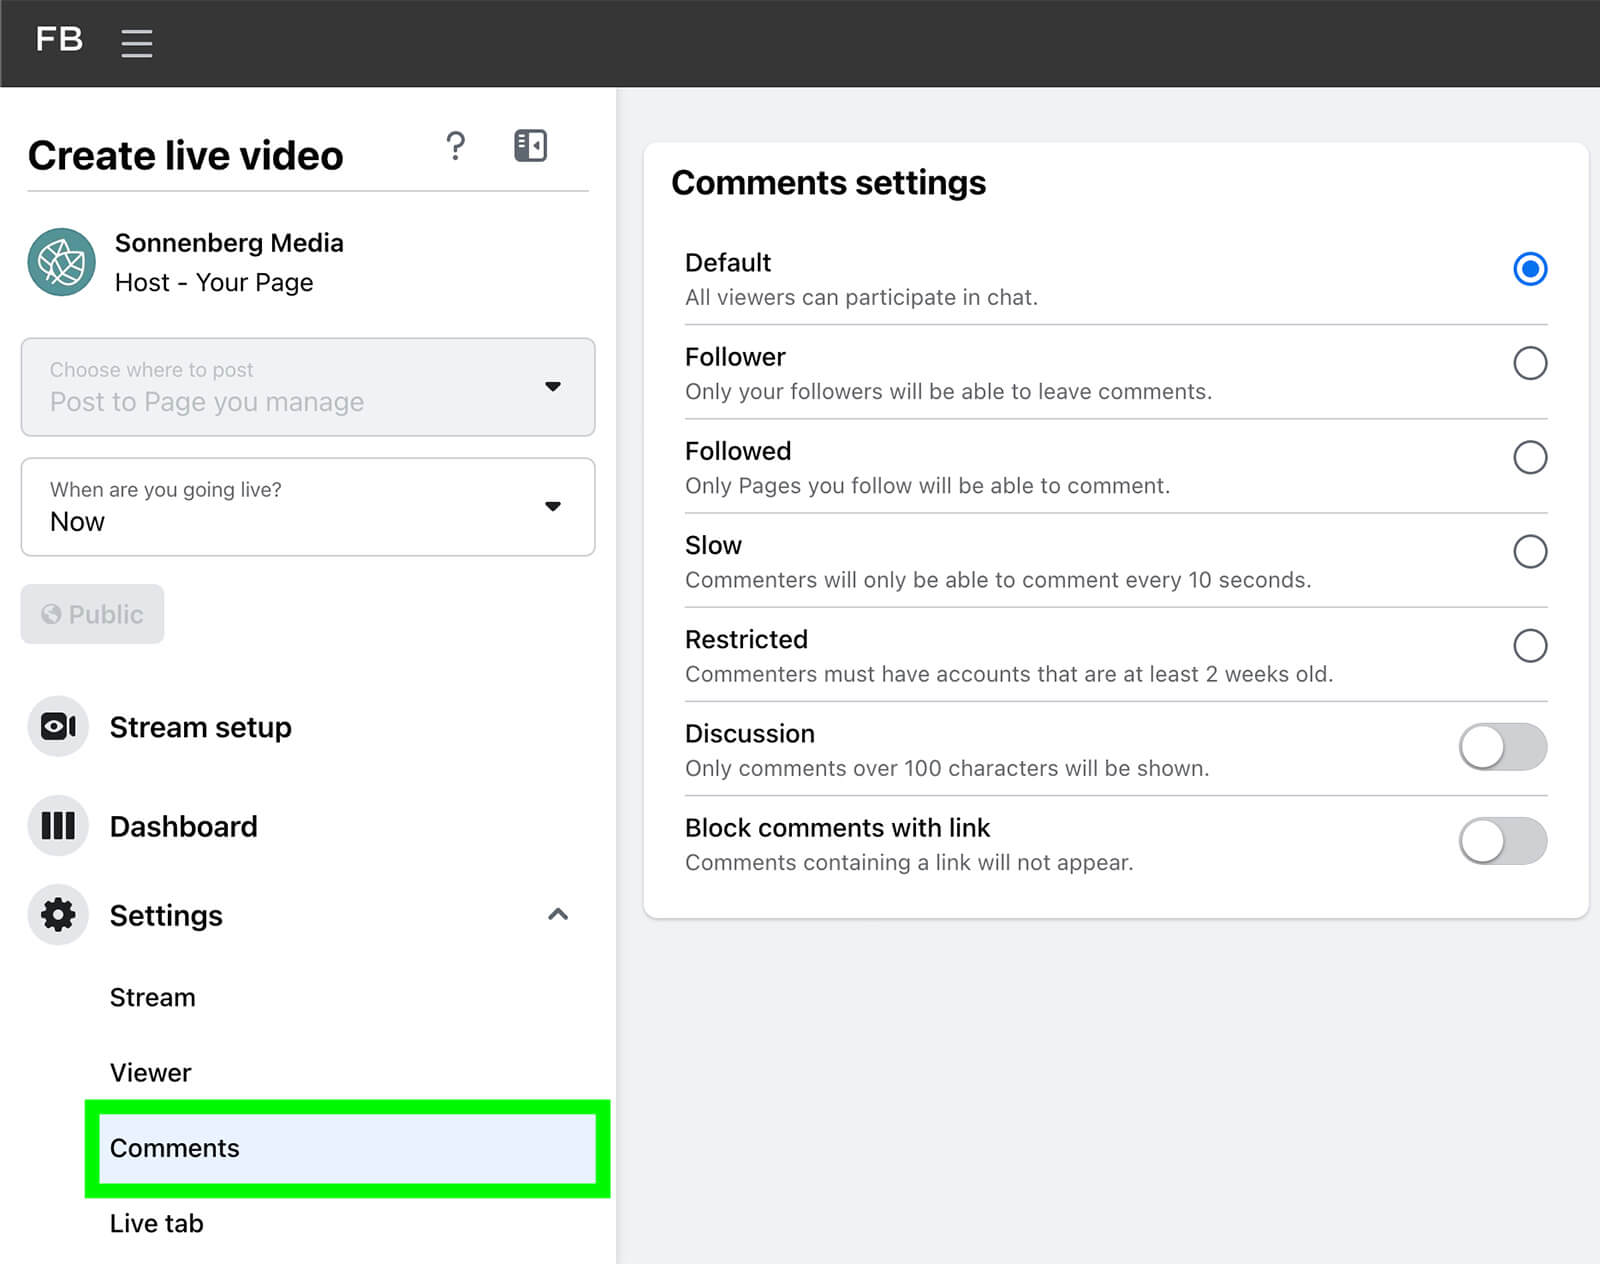
No matter which setting you choose, you can opt to block comments that include a link. Choosing this setting can help prevent other users or pages from promoting themselves or spamming your live event.
Do you want to streamline Facebook page engagement? Looking for an easier way to stay on top of comments and conversations?
In this article, you’ll learn how to moderate conversations happening on your Facebook business page’s posts, ads, and video using native tools from Meta.
#1: Meta Tools to Moderate Facebook Page Posts Made by Consumers
By default, a Facebook page allows visitors to publish posts or write reviews. If your page tends to attract positive posts or rave reviews, you may not need to adjust these settings. But if your page receives a lot of offensive posts or spam reviews, moderating them can help protect your brand reputation and give followers a good experience on your page.Post and Review Moderation With the Classic Pages Experience
If your page uses the classic pages experience, you can adjust these rules from the Settings menu. Open your Facebook page and select Settings from the left-hand menu. On the General tab, look for Visitor Posts and click Edit.
You can disable posts by other people on your page, which prevents customers or potential clients from creating posts. Or you can opt to review the posts that other users create before they go live. In addition, you can opt out of allowing photo and video posts.
To switch off reviews, open the Templates and Tabs menu in your page settings. Look for the Reviews tab and switch it off. Reviews will no longer appear on your page and visitors won’t be able to leave new ones.

Post and Review Moderation With the New Pages Experience
If your page uses the new pages experience, you’ll need to use a different workflow to change the page post settings. Open Facebook and switch to interacting as your page. Click your page profile icon in the upper-right corner and select Settings & Privacy from the drop-down menu. Then select Settings to open the full menu.From your page settings, click the Privacy tab and select Page and Tagging. If you want to prevent visitors from creating posts on your page, go to Who Can Post on Your Page? and click the Everyone button.

You’ll see an option to select Only Me instead. If you select this setting, no one aside from your page will be able to write posts, share links, or publish photos and videos on your page.

You also have the option to turn reviews on or off from this tab. To switch the settings, click the toggle next to the Allow Others to View and Leave Reviews on Your Page? option.
Post and Review Moderation in Business Suite
If you have either reviews or page posts switched on, you can monitor relevant content from Business Suite. Click on Inbox and go to the Facebook Comments tab. You can tell these posts apart from other engagement (like comments) because consumer post previews display the name of the person who wrote them.When you click on a visitor post or customer review, you have the option to react, comment, or share. If the post features sensitive content, you might also consider responding privately. Click the Message button to send a direct message instead.

Note that Facebook only allows pages to respond with a DM for up to 7 days after the original post. If you missed the 7-day window, you can always comment and encourage the original poster to message your page. But it’s a better idea to monitor page posts and reviews regularly so you don’t miss something important.
#2: Meta Tools to Moderate Comments on a Facebook Page Post
Unlike visitor posts and customer reviews, you can’t switch off comments on the content you post to your page. That’s probably a good thing since switching off page comments would eliminate a lot of engagement, which could negatively affect your content distribution.But if your content receives a lot of spammy or irrelevant, unwanted comments, you have a lot of helpful options to moderate comments efficiently. Let’s look at switching off comments on certain posts, automatically moderating engagement, and other native Meta tools.
Turn Off Commenting for a Specific Facebook Page Post
While you can’t turn off comments on all posts with a single click, you can switch them off selectively. For example, if you anticipate receiving negative feedback for posts on a certain topic, you can turn comments off preemptively. Or if the comments on a post have gotten out of control, you can switch them off.If you’re using the classic pages experience, go to your page and find the post you want to moderate. Click the three dots in the upper-right corner of the post and select the Who Can Comment on Your Post? option.

Then consider the options. By default, commenting is public but you can change it to Pages You Follow if you want to limit commenting to a smaller group. If you only want a select few people to be able to comment, choose Profiles and Pages You Mention instead. Then make sure you’ve tagged relevant profiles or pages in the post.
If your page has switched to the new pages experience, you can access moderation tools when you use Facebook as your page. Open Facebook, click your profile in the upper-right corner, and switch to your page.
Then navigate to your page, go to any post, and click the three dots in the upper-right corner. Select Who Can Comment on Your Post?, and then choose whether you want to keep commenting public or limit it to certain profiles and pages only.
Hide Specific Comments on a Facebook Page Post
If one of your posts has already generated a lot of negative or spammy comments, you can moderate them as necessary. In Business Suite, open the inbox for your page and go to the Facebook Comments tab. Then scroll through the comments on your posts.When you find a comment you want to remove from the post, click Hide Comment. The commenter and their connections will continue to see the comment on the post. But for everyone else, the comment will be hidden. You can always return to the post and unhide the comment.

For a more permanent solution, you can use the same workflow to delete the comment completely. If the comment is harmful, violent, or otherwise offensive, you can also report the post to Meta.
Moderate Comments for Keywords and Profanity
Have you noticed off-topic, offensive, or outright spammy comments on your page posts? Hiding individual comments isn’t your only option. You can also keep a running list of the words that appear throughout these comments and then you can ban them from your page.In the classic Facebook pages experience, start by going to Page Settings and selecting the General tab. Look for Profanity filter and click the Edit button. To turn it on, check the box and click Save Changes. Meta will automatically hide posts and comments that use common profanity.

To block certain words from comments on your page, look for Content Moderation and click the Edit button. You can add up to 1,000 keywords or emojis that you want to hide automatically from your page. If you have a long list, upload it as a CSV file.

In the new Facebook pages experience, you can find comment moderation by going to Settings, clicking on Privacy, and then selecting Public Posts. Then scroll down to Content Moderation. If the Profanity filter option isn’t already on, click Edit to begin using it.

For more control over the terms you ban from your page, click the Edit link next to Hide Comments Containing Certain Words From Your Page. Then add all of the terms and emojis you want to hide.

Keep in mind that Facebook automatically bans keyword variations so there’s no need to enter every possible spelling or usage. Click the Show Variations button to check similar terms and remove any that you don’t want to hide.

If your team has kept a running list of keywords to ban, you can click the three dots to upload a spreadsheet easily. You can also copy and paste a list from other programs or other pages you manage.
Use Moderation Assist
To save even more time on monitoring page comments, use Meta’s Moderation Assist tool. It essentially acts as a virtual moderator that uses your cues to hide the content you don’t want on your page. Note that this tool is currently available for the new pages experience only.
To access Moderation Assist from the new pages experience, switch to your page and open the professional dashboard. In the left-hand menu, select Moderation Assist and click the Let’s Go button to get started.
Facebook automatically recommends hiding comments from users with no connections. If your page has a lot of followers who are new to Facebook or who aren’t particularly active, you can click to remove this recommendation.

Otherwise, keep it and click the Add button to select more options. Here, you can choose from the full list of moderation options. For example, if you get a lot of spam comments from new users, you might want to hide comments from new accounts or those without a profile picture. To add one of these options, select it and click the Add button.
You can also ban content based on aspects of the comment. For example, you can automatically hide all comments with links or just links to certain sites. You can also hide comments that include media like images or videos. (Currently, there isn’t an option to ban GIFs only.)
Moderation Assist can also hide certain keywords automatically. Since this option does the same thing as the keyword moderation tool, it’s a good idea to choose one or the other. There’s no need to repeat blocked keywords on both lists. If you need to remove a banned keyword, using dual tools could complicate the process.
Once you set up the tool, you can track its activity and make changes at any time. Click the pencil icon to the right of any criterion to edit or remove it from the tool.

Go From Comment to Message Automatically
Effective moderation calls for more than making sure you’ve hidden comments that are inappropriate. If your page receives a lot of comments that require private messages, consider automating the process in Business Suite.Open the inbox for your page and click Automations in the upper-right corner. Find Comment to Message in the list of automations and click Edit to adjust the settings. Note that you can’t automatically respond to comments publicly so responding with a message is your best option.

For example, say you receive a lot of questions about where to buy your products or how much they cost. You can set up a simple chatbot that sends relevant information in DMs and leverages Messenger marketing.

Start by adding a relevant hashtag. Then write a message with the information you want to share. You can add buttons, links, and emojis. You can also personalize the message to include commenters’ names. Save the automation and switch it on to begin using it to moderate comments.

#3: Meta Tools to Moderate Facebook Ad Comments
Moderating comments on Facebook ads can be tricky. On the one hand, positive engagement can improve ad delivery. It also gives your brand a chance to showcase its personality. But on the other hand, negative comments can compromise your brand’s reputation and scare customers away.Since Meta doesn’t allow advertisers to switch off ad comments altogether, it’s important to monitor ad engagement constantly. Fortunately, you can use a lot of the page moderation tools we covered above to manage comments on your ads.
For example, any keywords that your page automatically moderates will be hidden from comments on your ads as well. The same goes for your page’s profanity filter settings—they also apply to ad comments.
To review and respond to Facebook ad comments, use Business Suite. Just like organic post comments, ad comments give you the option to hide or delete as necessary.
In extreme situations, you can also ban users from your page, which may become necessary if they repeatedly post negative or offensive comments on your ads. To block users from the classic pages experience, open Page Settings and select the People and Other Pages tab. Select Banned People and Pages from the drop-down menu and enter the person you want to block.

To block users from a page using the new pages experience, go to Settings, click Privacy, and then open the Blocking tab. Here, you can enter the users, pages, and apps you want to block from your page.

#4: Meta Tools to Moderate Facebook Live Comments
Moderating comments during a Facebook Live can be especially challenging, especially if you’re managing the event solo. Before you go live, adjust the comment settings in Live Producer. In the left-hand menu, open the Settings menu and select Comments.Then pick the setting that’s most likely to lead to a positive livestream. Use your past live experiences to guide your approach. For example, you can limit comments from new users or people who don’t follow your page. You can also prevent users from commenting more often than every 10 seconds.

No matter which setting you choose, you can opt to block comments that include a link. Choosing this setting can help prevent other users or pages from promoting themselves or spamming your live event.


