Source
If you feel that you are wasting money with Google Ads!
There are some common mistakes that marketers usually make while setting up their search campaigns in Google Ads.
In this guide, we will look at the common mistakes and how to avoid them for an optimized Google Ads search campaign.
Google Ads conversion tracking measures the success of your ad campaigns by tracking the conversion behavior of your audience.
This is your way of telling Google what your goals are!
For example, if you’re an eCommerce store, a conversion would be somebody who ultimately purchased your product or if you are a local business, it might be somebody filling in a contact form.
First, you need to set up Google Ads conversion tracking before you start creating any campaigns. Conversion tracking will help you know if you’re getting returns on the money you have invested in Google Ads search campaigns.
There are multiple methods to track conversions in Google Ads. You can either use the built-in Google Ads Conversion Tracking method, or you could import your existing goals and eCommerce conversions into Google Ads from Google Analytics.
If you’re not sure that you’ve set up conversion tracking, you can check it under the Conversions menu of Google Ads. To access it, navigate to Tools & Settings → Measurement → Conversions.
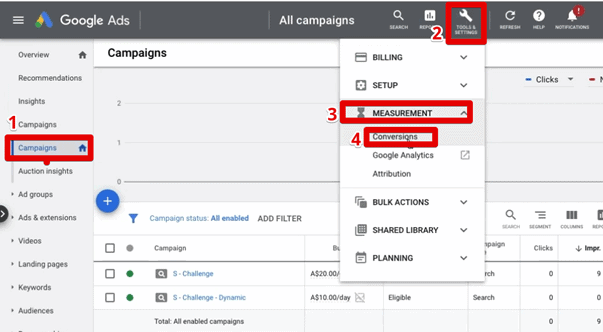
Let’s create a new search campaign to understand how to avoid mistakes. To do this, click on the plus button on the left of the screen.
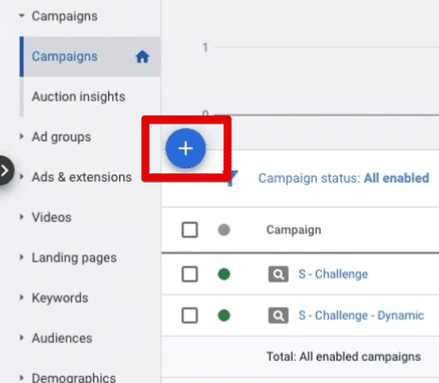
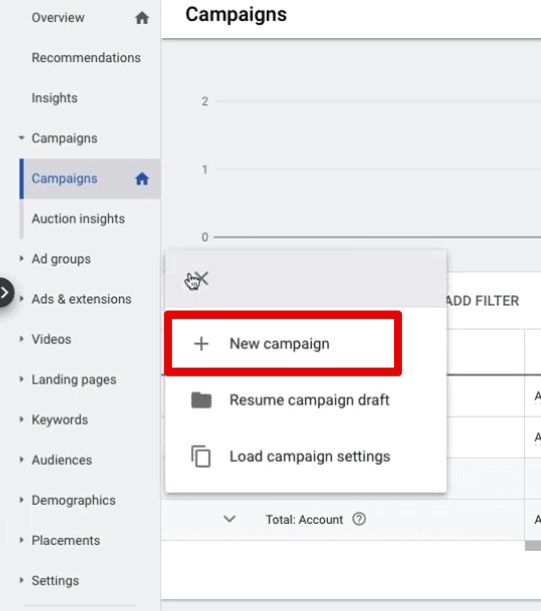
This will give you options to start campaigns. Click on New campaign.
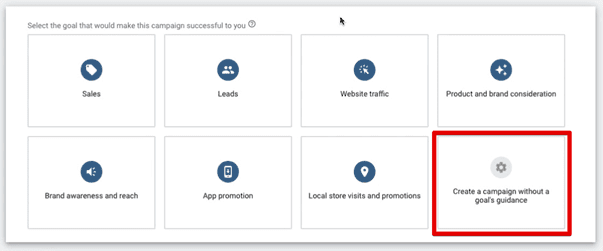
Next, we need to select the goal of a successful campaign.
For this example, let’s try the Create a campaign without a goal’s guidance. This gives you all the available settings to set up a campaign, thus providing more flexibility in defining your goals.
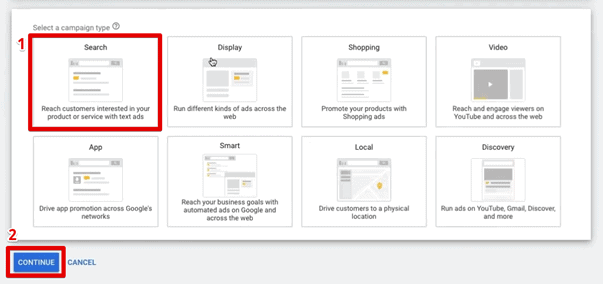
Let’s select a campaign type. There are many campaign types that you can select from.
But now, we want to set up a search campaign. So let’s click on the Search option and click on Continue.
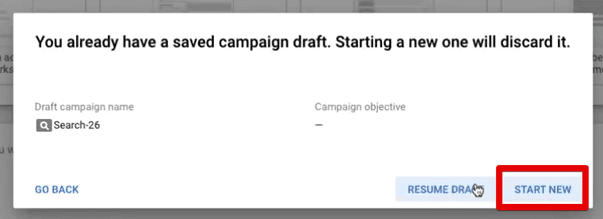
Click on Start New to start the campaign.
Let’s give a relevant campaign name and move forward in our search campaign setup.
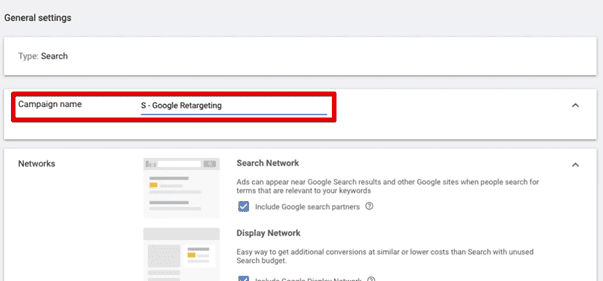
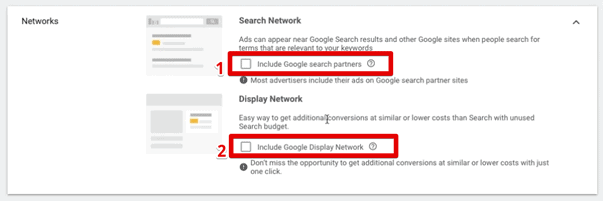
Google by default keeps the Search Network and Display Network options checked.

The Display Network option gives many impressions with a low click-through rate.
It is a good idea to keep the Display Network option on. But, it is not recommended to use the Search Network option.
The Search Network shows your ads on Google partner sites. You can choose to keep this option checked or not based on your requirements. For this guide, we’ll keep it unchecked.
To move ahead in our setup, click on Show more settings.
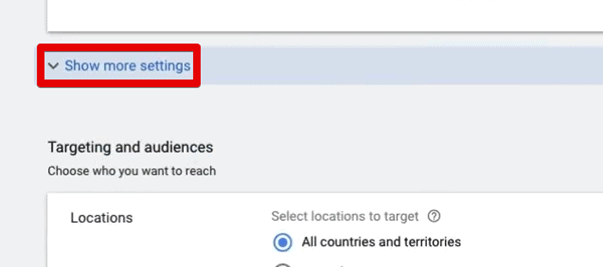
It will expand the menu to give you more options for your search campaign setup.
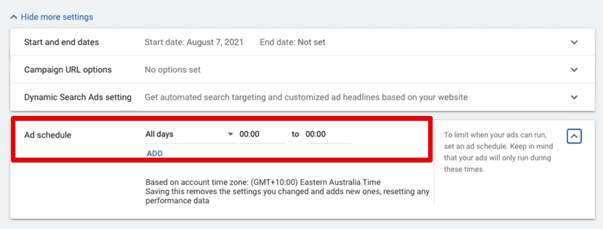
A mistake that marketers, especially local businesses, make is to ignore this setting.
If you have a business that runs only for dedicated hours in a day, it would make sense for you to run the ads only during those hours.
You can select the days and the timings for when you want the ad to run. The Ad schedule is where you can limit when your ads can run.
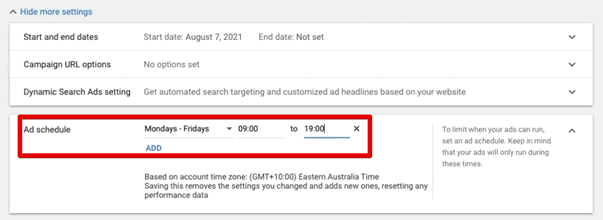
On the contrary, if you’re selling an online course, you don’t need to have an ad schedule.
Thus, depending on your type of business, you should consider whether to add an ad schedule or not.
In this case of promoting an online course, we would create different campaigns for different countries. Let’s try to apply some location targeting in our Ad Search Campaign.
Be aware that All countries and territories are selected by default. It’s a classic mistake to avoid this default setting that Google has kept for us.

Let’s say we want to target the United States. We can choose a country to target from Enter another location.
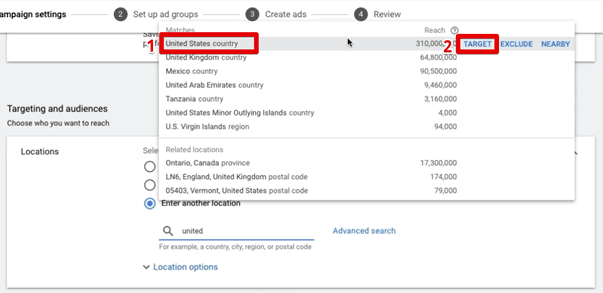
If you want to make sure that you don’t advertise in certain places, you can also exclude countries.

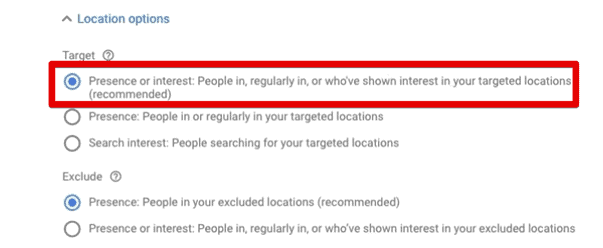
If we hover over the location options, there is another little setting called Target which is part of the location targeting. The default setting is for People in, regularly in, and, or who’ve shown interest in your target locations.
This default setting means that the Ad would be shown to somebody who has shown interest in the US (because we’ve set our location target audience as the US).
If somebody who’s in Europe has shown interest in things in America or the country in general, then the ad will be displayed to them too.
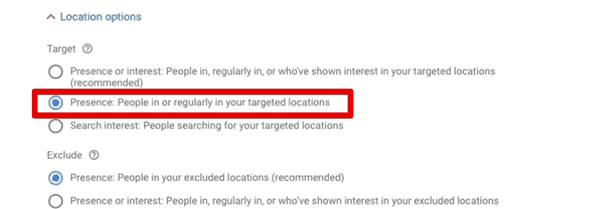
It helps to keep a tight location target setting, so only the people in that area are targeted. Then, choose the middle option Presence: People in or regularly in your target locations on your Target setting.
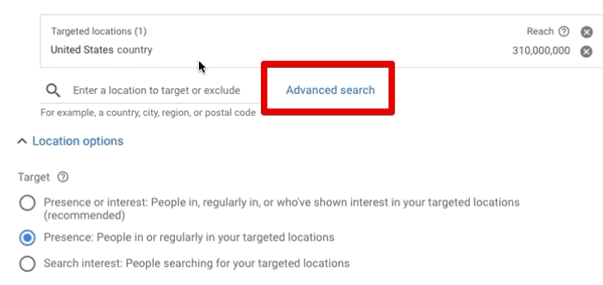
If you’re a local business, you don’t want to target a whole country, but just the people in your area. We can take it a bit more granular, and go to Advanced Search and go ahead for Radius targeting.
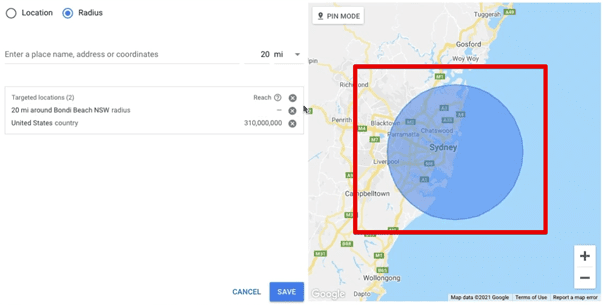
Let’s imagine we are in a suburb in Sydney. Let’s enter Bondi, then we select Bondi beach. We enter a 20-mile radius and click Target.
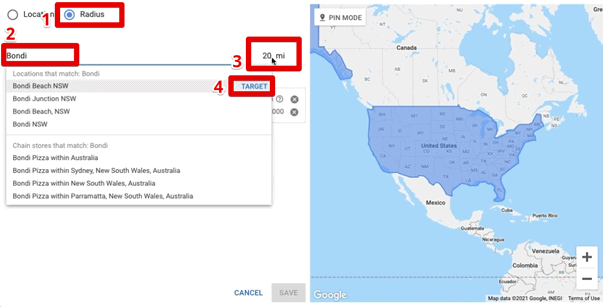
You’ll see it shows a 20-mile radius there, so you can do Radius targeting easily.
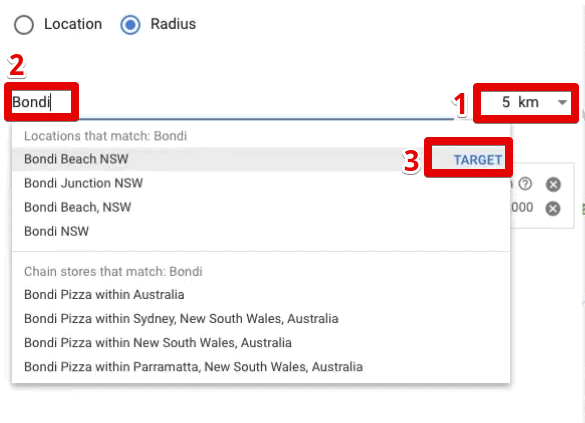
If you want to change the 20-mile radius to kilometers, you can change it to kilometers. We can make it 5 kilometers. We’ll type in Bondi, and click Target.
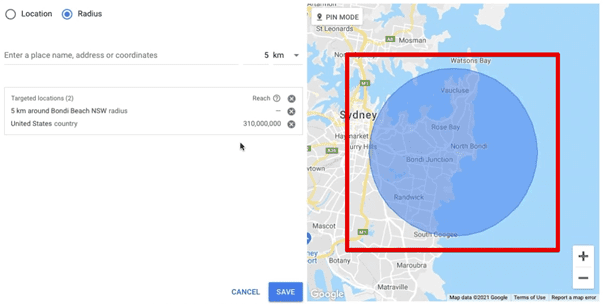
Choosing a kilometer radius makes it tighter for more impact
You can see it’s a much smaller circle, implying the ad is specific to that area only.
Depending on what type of business you have, where you want to advertise, and what’s appropriate for your depths, you can refine it even more.
Suppose you have a dental practice in Bondi, and you don’t want to advertise it to all of Australia. You only want to advertise to the area that’s reachable to you.
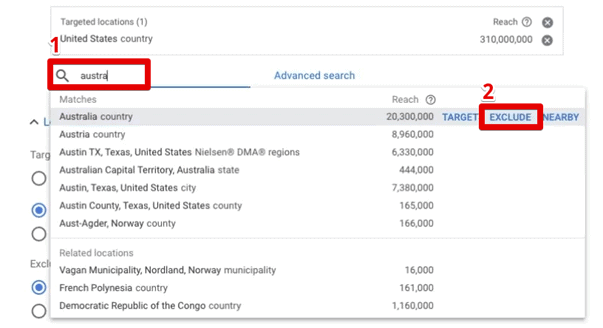
You can also exclude a country. So, let’s pretend we want to exclude Australia, we can add an extra layer of the filter.
If you feel that you are wasting money with Google Ads!
There are some common mistakes that marketers usually make while setting up their search campaigns in Google Ads.
In this guide, we will look at the common mistakes and how to avoid them for an optimized Google Ads search campaign.
Not Setting up Conversion Tracking
The first classic mistake that people make is they don’t set up conversion tracking.Google Ads conversion tracking measures the success of your ad campaigns by tracking the conversion behavior of your audience.
This is your way of telling Google what your goals are!
For example, if you’re an eCommerce store, a conversion would be somebody who ultimately purchased your product or if you are a local business, it might be somebody filling in a contact form.
First, you need to set up Google Ads conversion tracking before you start creating any campaigns. Conversion tracking will help you know if you’re getting returns on the money you have invested in Google Ads search campaigns.
There are multiple methods to track conversions in Google Ads. You can either use the built-in Google Ads Conversion Tracking method, or you could import your existing goals and eCommerce conversions into Google Ads from Google Analytics.
If you’re not sure that you’ve set up conversion tracking, you can check it under the Conversions menu of Google Ads. To access it, navigate to Tools & Settings → Measurement → Conversions.
Let’s create a new search campaign to understand how to avoid mistakes. To do this, click on the plus button on the left of the screen.

This will give you options to start campaigns. Click on New campaign.

Next, we need to select the goal of a successful campaign.
For this example, let’s try the Create a campaign without a goal’s guidance. This gives you all the available settings to set up a campaign, thus providing more flexibility in defining your goals.

Let’s select a campaign type. There are many campaign types that you can select from.
But now, we want to set up a search campaign. So let’s click on the Search option and click on Continue.

Click on Start New to start the campaign.

Let’s give a relevant campaign name and move forward in our search campaign setup.

Search Network + Display Network
The next step in our search campaign setup brings us to a second common mistake.Google by default keeps the Search Network and Display Network options checked.

The Display Network option gives many impressions with a low click-through rate.
It is a good idea to keep the Display Network option on. But, it is not recommended to use the Search Network option.
The Search Network shows your ads on Google partner sites. You can choose to keep this option checked or not based on your requirements. For this guide, we’ll keep it unchecked.

To move ahead in our setup, click on Show more settings.

It will expand the menu to give you more options for your search campaign setup.
Ad Schedule
Here, you can set an Ad schedule to run your ads. By default, the ad will run every day with no time restrictions.
A mistake that marketers, especially local businesses, make is to ignore this setting.
If you have a business that runs only for dedicated hours in a day, it would make sense for you to run the ads only during those hours.
You can select the days and the timings for when you want the ad to run. The Ad schedule is where you can limit when your ads can run.

On the contrary, if you’re selling an online course, you don’t need to have an ad schedule.
Thus, depending on your type of business, you should consider whether to add an ad schedule or not.
Location Targeting Setup
Another common mistake is that we don’t input our location targeting properly. It is necessary, especially for local or small businesses.In this case of promoting an online course, we would create different campaigns for different countries. Let’s try to apply some location targeting in our Ad Search Campaign.
Be aware that All countries and territories are selected by default. It’s a classic mistake to avoid this default setting that Google has kept for us.

Let’s say we want to target the United States. We can choose a country to target from Enter another location.

If you want to make sure that you don’t advertise in certain places, you can also exclude countries.

If we hover over the location options, there is another little setting called Target which is part of the location targeting. The default setting is for People in, regularly in, and, or who’ve shown interest in your target locations.
This default setting means that the Ad would be shown to somebody who has shown interest in the US (because we’ve set our location target audience as the US).
If somebody who’s in Europe has shown interest in things in America or the country in general, then the ad will be displayed to them too.

It helps to keep a tight location target setting, so only the people in that area are targeted. Then, choose the middle option Presence: People in or regularly in your target locations on your Target setting.

If you’re a local business, you don’t want to target a whole country, but just the people in your area. We can take it a bit more granular, and go to Advanced Search and go ahead for Radius targeting.

Let’s imagine we are in a suburb in Sydney. Let’s enter Bondi, then we select Bondi beach. We enter a 20-mile radius and click Target.

You’ll see it shows a 20-mile radius there, so you can do Radius targeting easily.

If you want to change the 20-mile radius to kilometers, you can change it to kilometers. We can make it 5 kilometers. We’ll type in Bondi, and click Target.

Choosing a kilometer radius makes it tighter for more impact
You can see it’s a much smaller circle, implying the ad is specific to that area only.

Depending on what type of business you have, where you want to advertise, and what’s appropriate for your depths, you can refine it even more.
Suppose you have a dental practice in Bondi, and you don’t want to advertise it to all of Australia. You only want to advertise to the area that’s reachable to you.
You can also exclude a country. So, let’s pretend we want to exclude Australia, we can add an extra layer of the filter.


